Tuesday 10th September 2019
Blender Session 1
Blender Session 1
Today was our introduction to Blender, an open-source computer graphics software used for; 3D moulding to create films, short scenes, visual graphics, 3D printed models, motion graphics, interactable applications and even games. We will be learning how to use this software as a tool to create the 3D models we will need for our future 3D game development. We were brought through the basics of Blender to which I broke down into different sections.
Object Mode
Object Mode is the workspace where you can view the objects in your scene and edit them in multiple ways. A new file always starts off with a cube in the centre at a specific viewpoint.

You can alter the viewpoint of the workspace in multiple ways:
1) Clicking and dragging with the Mouse Wheel/Alt Key

This allows you to freely look all around the workspace in 360.

You use the scroll button with a mouse however you can change it to work with Alt key by toggling the Emulate 3 Button Mouse commend in the User Preferences.
2) Clicking and dragging with the Mouse Wheel/Alt Key while holding Shift
This moves the view without changing the angle of the view. This also allows you to divert your view away from the object space.

3) Number Pad
Some numbers on the number pad show the model from specific views. Examples are:
7: Show the Top
1: Shows the Front
3: Shows the Side
By pressing the period key on the number pad, the view will automatically focus on the selected object.
By pressing the period key on the number pad, the view will automatically focus on the selected object.

Shapes
You can insert shapes by going on the create tab or by pressing Shift+A and going on the mesh tab.


When an object is created, you can change, alter and edit it in multiple different ways.
Scaling

You can scale an object to be bigger or smaller. This can be done by pressing S when the chosen object is selected. The scale of the object will increase/decrease depending on where the mouse moves, and it will continue to regardless where the mouse goes. When you are happy with the size, left-click the screen to leave scaling mode.
Object Resolution Altering

Disclaimer: these properties can only be altered upon the creation of the object, making any other edits to the object will cause these property options to disappear, thus preventing any further altering to them.
Moving Objects
There are many different ways you can move objects around the 3D canvas.

1) On the middle of each object, there is something called a 3D Widget Tool. It appears as a circle that holds the end of 3 different arrows. Each arrow point to one of the 3 axes, the X, Y and Z. Once your press the arrows and move the mouse in the same direction that they are pointing, the object will move along that direction.

2) When an object is selected, pressing G will make it move with the mouse, giving full control on where you can place the object. Left-click will place it in the new location, right-click will set it back to where it was before.

3) While you're moving the object
with G. you can make it follow the mouse on a specific axis by pressing the letter key that represents it. Pressing X makes it only move on the X axes, Y makes it only move on the Y-axis and the Z key makes it only move vertically.
with G. you can make it follow the mouse on a specific axis by pressing the letter key that represents it. Pressing X makes it only move on the X axes, Y makes it only move on the Y-axis and the Z key makes it only move vertically.

4) While you're moving the object with G, you can also press the Mouse Wheel. Doing so will make a line that grows shorter and longer with the movement of the mouse and points in its direction. You can point it to any of the axes to move the object along it.
Rotating Objects
Select an object, then press R. The object will rotate 360 along with the mouse's movement. Similar to the moving action caused by pressing G, if you press the Mouse Wheel or press X, Y, Z, the rotation can be made to only go along certain axes.

Edit Mode
Edit mode is one of the many different modes of the program. Unlike Object Mode, this mode focuses only on the selected object and no other can be clicked or edited. Edit mode is used for altering the form of existing objects by allowing you to select all vertices, edges, and faces of the object.

To trigger this mode, you can select it in the mode selection panel, or use the shortcut, the TAB key or by directly going on the Modle Mode Tab.
Using the selection tab at the bottom, you can decide whether to only select edges, vertexes or faces. A face can also be selected if you have Vertex Select then selecting all corners around a square (or any other 2D shape shown in edit mode), will select the face. If Edge Select is one then you only have to select the edges.
By holding Alt while you click, you can select a whole row of edges or vertices. Holding Shift allows you to select multiple and A automatically selects all parts.

This mode is useful for editing a more controlled amount of the object without having to select anything individually.

There are different Fallout options for the proportional edit mode. These determine how the selected parts will be altered. For example. pressing the Sharp option will make and sections moved have sharp points while Circle would have the opposite.

Pressing B in edit mode allows you to use Box Selection, where you draw a box with the left button and anything that is covered by it will be selected. However, if you click with the scroll wheel, the box will deselect parts.

By pressing C, another circle will appear which size is controlled by the Mouse Wheel as well. It can be used as a brush for selecting the different parts of the shape. Whatever the circle goes over, will be selected. It also depends on what selected mode is on. Just like the previous one, using the scroll wheel deselects.

Pressing Z triggers Wireframe Mode, where all faces become invisible and in edit mode, allows the skeleton of the shape to be seen. This allows all parts to be selected even if you aren't facing the side as there is no face to block it.
Nodes Editor
 The Material Nodes ( or Nodes Editor ) page is an extension of the Materials tab, allowing more control and options for the effects the materials can make.
It works as a collaboration of many different tabs that represent different properties which join together to add unique effects to objects.

You start off adding inputs and joining them all together. When that's done, you join it to an Output tab and the effect will take effect in the render.
The Node Editor screen is useful for when you want to do more complex, such as combining Shades which are different types of shades you can add to the surface of an object. For example, you can mix the Diffuse with the Glossy shade together. With one being smooth and flat while the latter is shiny and glows. Allowing you to mix the 2.
Modelling A Tree
After all of the learning with the basics of Blender, it was time to put them into practice. As our first practice with modelling, we were tasked to make a Tree using the cone shape.
Instantly I knew how I would make it. First, I pressed 1 on the number pad so that I could see a flat view of the object, in this instant allowing me to see the cone as a triangle. Most basic tree drawings are made up of multiple triangles on top of each other, so I knew to make a 3D version of this, I would have to put multiple cones the same way.
This encouraged me to find a way of duplicating the object without having to create a new one. So I tried different combinations with the Key D as in some programs it is used for duplicating.
Ctrl+D didn't do anything, however, Shift+D managed to copy the object.
Duplication
By pressing Shift(or ALT)+D, any selected object(s) will be duplicated. They are automatically placed in the exact same position as the original, however, you will be able to freely move them with the movement of the cursor upon creation, just as if you pressed G on it.

I made 2 copies of the cone and put them all together. Then I made one last one at the bottom to pose as the branch.

After, I gave the tree colour.
The surface looked very basic and plain. This is where it may be appropriate to add an Image Texture to the object.
Image Texture
When giving an object colour in the Materials Tab, there is a dot you can press next to it which will give different options. One of them is Image Texture, allowing you to paste the content of an image on the surface of the object.
However, it appears to make no difference afterwards. This is due to only 1 pixel of the image being implemented. What you have to do is Mark Seams on the object and then Unwrap it.
What this does is that it's taking the Net of the object to make an accurate calculation on how the image should wrap around the object.

After this. the image should appear all around the object.
Reflection
Learning all the basics in Blender was quite tricky, as there appear to be many many things to learn about its interface, there are many things you can do and even multiple ways of doing them how I described the 4 different ways to simply move an object.
However, I believe that I have learnt quite a lot and it shows how I was able to model a tree for the first time with minimal issues. Blender seems like a very complex but extraordinary platform and I look forward to learning more about it.
Drawing Fundamentals: Lesson 1
Figure Drawing
To aid our skills for creating modules for our future work in 3D, we will be having weekly drawing lessons.
This week we started with learning to draw the basic form of the human figure.

First, we were given the task to draw a male or female body from scratch to soo how our initial ability with it was at. My first attempt was rather poor as I haven't had much previous practice with it. There weren't any shoulders and none of the line art defined any part of the body, such as the elbows.
Then we were given a sheet printed from a book made by Andrew Loomis, a former American illustrator. It showed a generic template for the form for male and female. This allowed me to see the fundamental difference between both of them.
Males are normally drawn with sharper and straighter lines, with broad shoulders and usually being top-heavy. Having the cheat wider than the waste.
Females are drawn with much more smooth and curved lines. Usually drawn down heavy, having the waste larger than the torso.


My second attempt in trying to draw the male figure was slightly more successful. Using the sheet as a reference and drawing my own lines as guildies for the proportion of the body, I was able to draw the head, shoulders and legs.
However, the problem I fell into was that after I drew the arms, they weren't enough space to draw the torso.

So I tried again but I made a box to determine where the arms would go to help with the distance between them. However, it still ended up looking the same.
Then after studying the sheet a lot more, I realise that there's a technique to it that I was missing. An import skill in drawing is to Draw Whats Infront First. Which means that whatever would be in front of you if the drawing was real.
I tried to test this using a quick sketch of just the upper body. I decided to try drawing the abbs of the figure first as it should overlap arms.

After three attempts, I managed to make a decent upper body, especially when I added the other details like the mark that defines the gap in the abs.

Then I decided to practice a little more but with the full body. It went really well. I managed to make the arms equal and a good distance apart and make a decent sized torso. Although I may need a little more work on the legs, I believe that they both look like a big improvement. I was even able to slightly able to alter the form a bit by making the second attempt more robust. I will practise more, this is a large improvement compared to the front view drawing I made that the beginning of the lesson.
Reflection
For a while now, I have always wanted to be able to draw the human anatomy, and shown by my drawing at the start, I haven't been very proficient with it. However, now using the technique of drawing what's in front of you first, I was able to make a large improvement is quite a little time.
This has shown me that sometimes when you're not very competent at a skill as you want to be, it can simply be down to your technique and not just your natural ability. I will practice this more and more until I master drawing the human figure.
Monday 16th September
Video Games: Theory Lesson 1
Today, we had a live debate about if videos games represent the demographics of society well or not. There were two teams, for and against. I was on the against team. My statement was that video games don't accurately represent the topic of mental health.
This was my research document with all my points on:
Reflection
Personally, I believe I did not do as well in this debate as I wanted to. I debate myself in my own time online but doing it in front of people while having to respond to points in real-time was new to me and had me cruck in the pressure of it a bit. My second issue is that I do believe I presented my first example very well with Batman Arkham Asylum. Peoples opposing points to it was that the game wasn't made to be realistic so making a case for it wasn't a strong point.
What I was trying to convey was that when you look at games that have mental illness embedded in them, these are most of the examples you can find. However, I realise I may have not conveyed this well and thus made people think I was making a personal case for that game in particular, rather than it being a part of my overarching pit. It was this that most spoiled my argument in the debate as the point that got the most attention was the one that criticised the most. I also could have done more research on the actual demographic itself, see how much people with mental illness play games and how much games about mental health cater to them.
But for my first time doing a live debate, it wasn't too bad and now I know my arguments need a lot more refining to ensure everyone understands.
What I was trying to convey was that when you look at games that have mental illness embedded in them, these are most of the examples you can find. However, I realise I may have not conveyed this well and thus made people think I was making a personal case for that game in particular, rather than it being a part of my overarching pit. It was this that most spoiled my argument in the debate as the point that got the most attention was the one that criticised the most. I also could have done more research on the actual demographic itself, see how much people with mental illness play games and how much games about mental health cater to them.
But for my first time doing a live debate, it wasn't too bad and now I know my arguments need a lot more refining to ensure everyone understands.
Tuesday 17th September
Drawing Fundamentals: Lesson 2
Face Construction
The way I went around this was to first draw a circle that represents the cranium, they draw a line in the middle. After that, I mark where each facial body part will be placed.
I found this to be quite simple but effective, as it easily allows you to slowly build the face in a way that's easy to measure and construct. Its also really straightforward to manipulate the features of the face when drawn this way. You can draw the jaw to be shard and jagged or smooth. You can also mark for the facial features to be higher up the cranium to control the size of the forehead.
As another task, I made up an abstract face which I tried drawing 3 times. Then I tried drawing the side view of them as well. This is where I also tried adding stylistic hair to the head as well. My first attempt at the side view was good and appeared to match but the last to weren't as good the first due to how I drew the hair.


What I need to work on is drawing the facial features. As the eyes I draw don't look realistic, I struggle to make both eyes equal, I only know of one way of drawing lips and I've haven't practised drawing ears much.


What I need to work on is drawing the facial features. As the eyes I draw don't look realistic, I struggle to make both eyes equal, I only know of one way of drawing lips and I've haven't practised drawing ears much.
Blender Session 2
Today, we were shown a video that indulged us in the task of modelling the human figure in Blender. I went through it step by step.
Modelling The Male Figure
1
Make/ Get a front and side view of a figure. Making sure both have equal proportion.


2
Place them in a fresh blender project. You can do this by clicking on Add Image and then find the images you want to add


Then alter the view properties of each image. This decides on which type of angle will the object be viewable. Make the front view of the figure viewed in the front and on the right for the side view.
3
Press 5 on the keypad to turn on Orthographic Mode. This allows flat objects like 2D images to be viewable.
4
Press 1/3 to switch between the front and side views of the figure.


5
Loop Cuts
Press Ctrl+R to make a loop cut. Loop Cuts are lines that split the shape into sections between where you place the line. Creating more vertices which allow more manipulation over the object.
Put a loop cut in the middle to split the cube in two and then delete one of the halves.


Now that both of the images are in place, essentially you have to create the code by tracing it with the cube shape by manipulating its shape over it.
6

Add a Mirror Modifier to the rectangle. This essentially creates a symmetrical and linked copy of the object. Whatever is done to the original will affect the copy in exactly the same way. This will allow the model to be symmetrical.
7

Then you drag the top part of the rectangle to the shoulders of the figure to go over the torso.
8

Then you add another Loop Cut, but this time also press 3. This automatically creates 3 Loop Cuts thereby showing that pressing numbers upon prompting the Loop Cut command will determine how much is created.
9
Using these Loop Cuts, you switch between both the front and side view of the figure to manipulate the shape to match the shape of the model.


10
Then you view the torsor in 3D again and add a Loop Cut in the middle of it. Then you select the sides of it so you can scale it which will smoothen it.

Then you view the torsor in 3D again and add a Loop Cut in the middle of it. Then you select the sides of it so you can scale it which will smoothen it.

11
Then you Extrude the top to start making the neck. Then go to the side to line it up with the side view


12

Next, you go to the waste and position the bottom to fit the waste.
13
Then you make the legs by extruding the bottom squares out and make them fit the shape of the drawing and line it up from both sides.


14
Now that the legs are done, the arms can be done next.

First, select the faces of the area the arms would be and duplicate them onto the arm in the drawing. This is so we can build an arm separate from the model that size fits with the model's shoulders.

First, select the faces of the area the arms would be and duplicate them onto the arm in the drawing. This is so we can build an arm separate from the model that size fits with the model's shoulders.
Then extrude them in the front view, and use rotation and make them fit the arms in the front view

 .
.Go to the side view and now make the arm fit the side view arm, using loop cuts to define the different sections of the arm. Then go back to the front view and do the same again


With that, the arm is complete, but it needs to be attached to the actual model. This is done by deleting the faces on the part the arm would be, along with the faces on the part on the arm that needs to be attached to the model.
Then you drag the arm to that part of the model while holding Ctrl, in which the arm should clip on.


I had a little trouble with is part, as when I clipped the arms the seams between it and the body were very apparent.

I couldn't figure out why, so I remodelled the arm with the only difference is one the first step where I had to duplicate the arm ara faces to the arm drawing, I moved it along the y-axis instead of placing it freely. The arm and the body are now seamless, showing that I was because they were properly aligned before.
15
Now the hands are next
First, create a cube where the hands are and then go to the side view to place it where the hand on the drawing is.


First, create a cube where the hands are and then go to the side view to place it where the hand on the drawing is.


Then aline the vertices to match the hand on both the side and front view, using loop cut when curves are needed.


After that, you can go on both sides of the half-finished hand to select each edge to use the Edge Slid command which makes it thinner if it looks too fat.

Then you do the thumb.First, you create another cube and place it on the thumb and make sure it fits on both sides.
Then shape the box on both sides of the thumb.


Then delete the front face of the upper part of the thumb and the face on the hand that's opposite to it. After that, you select each vertex of the deleted section of the thumb and hand one by one, pressing Alt+M to Merge each of them.
Finally, you delete the faces on the top of the hand and the bottom of the arm, select all the vertices and then press the space bar. Type in bridge edge loops, and then the hand and arm should merge.
Reflection
That all I managed to finish off however from what I did, I have learnt quite a lot and it was a fun experience. I was questioning at first how you would model something as abstract with the shapes provided, and now I see that using a simple cube, you can make almost anything if you have reference images with it.
I may use reference images to make models in the future and develop this even further.
Monday 23rd September 2019
Video Games: Theory Lesson 2
In the video game industry, many different constraints are placed upon the companies that work in it and the game's they produce themselves. In today's lesson, we first touch on this topic, learning about the many different examples of these constraints, which both come under 2 categories.
Legal Constraints
Ip Rights
IP rights (or Intellectual Property) is when somebodies work legally becomes their own property and any they can decide what happens to that piece of work. Any copying or modification to it without the permission of the owner is illegal.
Licences
Whenever any company wants the rights to an IP, it can be given the license to do so. Legally granting them all the rights with the IP that the original creator has/had unless they agreed to otherwise on a contract.
Whenever any company wants the rights to an IP, it can be given the license to do so. Legally granting them all the rights with the IP that the original creator has/had unless they agreed to otherwise on a contract.
Regulation
There are certain rules that all game developers are obligated to follow by law. Such as if a game is to be published, it has to be given an age rating. This is an example of regulation.
Contracts
Whenever two or more people/parties do some kind of business together, they form a Contract. This is a written or verbal (normally the former) to where they make an agreement of something. Both parties are required to follow their contracts and breaching it can lead to legal issues.
Ethical Constraints
Violence
The level of violence in a game can determine how appropriate a game is perceived. The more violent the game is the more mature it will be treated. At certain occasions, the violence level of a game can affect how successful it is, as some places have stricter views on it.
Education
Many games use their premise to touch on a certain topic to inform people of it. The message, accuracy and the method for this education can make or break it.
Rating
A games content is judged to determine what kind of age range it's appropriate for. Meaning that if developers have an age rating they aspire to, they have to make the game live up to it.
Stereotyping
Some games have cliche stereotypes of certain types of people for narrative purposes. However, a lot of the time they can be seen as offensive depending on how it's presented.
Addiction
The topic of addiction is a very sensitive one, one which is easy to inaccurately represent. This can lead to a backlash.
Tuesday 24th September 2019
Drawing Fundamentals: Lesson 3
Toning
Taking inspiration from the artists Alex Ross, we practised our toning, shading skills. Alex has made many books, showing how he got a lot of his inspiration with drawing portraits with high contrast shading and shadows from taking real-life pictures and artificially creates the shadows.
As a task, we tried the same method ourselves. We took pictures of ourself in a dark room with a lamp above use to print off and try to draw with the shading.

At first, I struggled with the shading as it would always look scratchy and white sections still remained.
I realised my problem was my technique. To shade effectively, you can use two methods. Crosshatching, which is shading an area from both sides and slowly and constantly going over each area multiple times.
I applied this method and finished my portrait.

0
ReflectionI don't believe It came out well. Mostly because the construction of my face wasn't very good, to begin with, due to how difficult it was to copy it with most of it blending with the shadows. While my shading id better when I was at first, I still need to work on it as I don't blive I merged the different shes with each other well and making it all look tidy.
Thursday 26th September 2019
Blender Session 3
Today, we learnt about how to colour our Modules in blender, using the UV Editor so that we can colour our human modules. I practised this using a cube to make the learning more simple and easier to understand.
Texture Colouring
1) Mark The Seams Of The Object
You will need the net of the object first, so you make the seams and then unwrap it. Then give the object a material.


2) Make The Setup
There are 3 different screens you need. First, you change the screen to Texture Paint, which is where you do colouring of an object. Then you make a second page, then change the menu to the UV Editor, which will show the net of the object. Then you make the third page and change it to the Nodes Editor menu.


3)Add An Image In The UV Editor Menu

This creates the texture for the object, which is what allows you to pain on the object.
4)Add The Image Texture Pannle In The Nodes Editor And Then Link It To The Main Colour

First, you Press Shift A, then you go on Textures and then Image Textures.

Once you do that, you lick the icon on it to add an image to it. This is where you add the textures that you created in the UV Editor. This allows all of the paint on the texture to be visible on the model.
5)Paint

After all of that, you should now be able to paint on the object using the colour pallet and so on.
Extra
With experimentation, I found out you can easily design the image texture on any image editor, like Photoshop. This is because the image texture for the UV paint will save as a png, meaning that you can open it in Photoshop and thus edit it in any way. All you have to do is to look at the net of the object and do whatever edits you want. Such as adding the textures Photoshop has or adding images like logos.


Reflection
I found learning quite intriguing but also confusing a first when reading from the sheet given to me, however, after finding a video that clearly quicky explained it, I managed to catch on to it without any issues. I will now be using this skill in the future when I have to make clothes for my models or just have to design any object I make.
I'm especially happy with how making a custom design for the net on Photoshop came out. It fit perfectly around the cube which gets me excited to possibly use this skill again as with my skils with graphic design, I would be able to have any kind of image on any object which can also increase the possible objects I can model.
Script
Now that we know how to model a human figure, we now have begun learning how to Rig a character. Which is when you give a model digital bones to make it move its body parts. This is so we can create walk cycle animations for the character to eventually add it to Unity.
Step 1
Scale the character to a realistic size human size.

First, place the 3D cursor in the centre with Shift+C, then create a cube to use as a scale reference. Go on wireframe mode and scale the model to be the same height as the cube.
Step 2
Place the model in the correct position

Delete the cube as its no longer needed, move the model on the z-axis to place it on the red line which will make it stand right on the floor. Click Cntrl+A to open the apply tab were you have to click on Location and Scale. This sets the models current size and position as its original one, which will make rigging easier later on.
Step 3
Place the first bone point.

Press Shift+A to create a Single Bone Armature. Drag it up on the z-axis until the bottom point is on the pelvis. If the single bone is hard to see you can turn on its x-ray to make it easier to view. Go on edit mode and click the top point, then move it down the z-axis until it reaches roughly where the belly button would be.
Step 4
Crate the spine

Click the top point and extrude it on the z-axis up to the top of the chest, then extrude that to the end of the neck, then extrude that to the top of the neck and extrude that up till the top of the head. This is the beginning of forming the skeleton.
Step 5
Make the arm bone
Duplicate the neck bone to the solders and then drag its bottom point to where the upper arm begins. Then go to the side view and keep extruding through the rest of the arm. Making bones for the upper arm, lower arm, wrist, knuckles and fingers. Then go to the front view and make sure the bones line up with the arm.


Then you make the bone for them thumb.
Duplicate the finger bone to the thumb in the front view and shape it to fit. Then go to the side view and make sure it lines up. When it's correctly placed, press W and Subdivide. This will split the bone into 2, which will allow the thumb to bend.


Step 6
Make the leg bone.

Duplicate the chest bone to the start of the leg and drag its point down to the knee. This is because the waist bone is too close to duplicate from, and because the chest is linked to the hip, this will make the leg linked to the hip to. Then extrude it to the ankle.

Then fix it on the side view, while also extruding the lower leg bones to the toes, then extrude another bone for the toes.
Step 7

First, you fix any twisted bones that are at a different angle. You press Ctrl+N in edit mode with all bones selected, then press View axis.

Press Ctrl+Tab to enter in Pose Mode. This allows the bones to move how they would realistically depending on how you joined the skeleton. You can check how you have done it by selecting bones like the hand and trying yo move or rotate it. seeing if the whole hand moves or rotates, then it has been done correctly. You can use this to check all bones.
Step 8
For housekeeping purposes, rename the bones.

Click the bone tab while having a bone selected, and you will be able to rename it

For the symmetrical parts like the arms and legs, you end the name with .L (with l bing capital). This is because when you eventually duplicate the arms and legs to the right side, it will change all the L's into Rs. Making it easier to identify them.
Step 9
Set up the Inverse Kinematic or IK system.
In simple terms, the Inverse Kinematic set up allow you to set certain bones to be able to manipulate other bones in different ways. For this case, it will be used on the legs as it will allow for more refined control over them as the leg is very rigid in its current state.

First, you extrude the ankle bone out straight on. select it, the present Alt+P and click Clear Parrent. This will severe any link the bones currently had however they are still a part of the same skeleton. Then click Shift+A to crate another bone. Line it up with the knee which should scale it down in the process.

Second, select the bone near the ankle and then the lower leg ( in that order) in Pose Mode. Press Ctrl+Shift+C to open the Add Constraints menu. Click on Inverse Kinematics.

After that, only select the lower leg bone then go to the bone tab. Where it says bone, set it to the pull target bone. This will cause the bones to shift forwards tilted. To fix this, set the Chain Length to two. This tells the IK that there are two bones in the leg.


You can improve it by going to the keen and try to move it by a few inches then chek if anything as changed about the legs movement. If not, keep trying until it does.
It took a while for me to get tight but after a few attempts and adding more bend to the leg, I was successful. The leg now moves realistically to how a normal one would.

Step 11
Make the right side
Now all of the bones have the correct position and properties, you can now make the right side of the skeleton. Go to the front view with wireframe mode on. Set the 3D cursor to the centre with Cntrl+C. Then duplicate the bone on the Y-axis by pressing 90. This will rotate it 90 degrees to the right. Then make sure all bones that are twisted are equal with Ctrl+N in edit mode with all bones selected, then press View axis.

Then with all of the fight bones selected, you press the Armature tab and Flip Names. This will turn all the bones that names ended with .L into .R. And now the whole skeleton is compleated.

Step 12
Pair the bones with the model.
In object mode, select the model and then the bones ( in that order) and press Ctrl+P. Press With Automatic Wights and now the bones and the model are linked.


And that's all there is with rigging a basic character
Reflection
Learning how to rig was a fun journey. At first, I was put off of it as when we were first shown it, It created an already made skeleton. Meaning the model would have to be moved and scaled until it fit the bone which could lead to inaccurate rigs which would either mean a lot more work would have to be put in when working on it or live with having a rig that doesn't fully match your character.
But when I found a video explaining how to make your own custom one, I was highly integrated. It took a while and was a little overwhelming some points, but besides that, I barely had any struggled and I'm proud of how I took the challenge of creating the rig myself and I'm proud of what I accomplished.
I plan on developing this further by trying to make more complex and abstracts Skeletons the future.
Preparing a video game for release in a new country or territory. This can be:
Translating text and dialogue.
This is in games like Kingdom Hearts where its original language for text and dialogue is in Japanise but when its Europe version realises it all gets adapted to English.


Recording new audio.


Germany tends to have strict opinions when it comes to violence in videogames. Even banning the distribution of some like Silent Hill: Homecoming for that exact reason. This has led to a very interesting trend of a particular method of censorship through different games. One of which is turning characters into robots.
In 2007 on October 10th, a game called Team Fortress 2 was released. It’s a first-person multiplayer shooter. The aim is to team up with your friends and kill the other characters. However, due to the exploding bodies and blood and gore, Germany thought that the graphic imagery was too violent. Instead of banning it like other games, they decided to change all the models into humanoid robots.


Germany has done this to many other games, like Turok Dinosaur Hunter, a first-person shooter game about killing prehistoric dinosaurs. There were parts where you had to kill human enemies. But in the Germany version, they were all turned into robots.


Soldier of Fortune II (2002) is another first-person shooter. The uniqueness of this game's violence is that it allows the player to go as far as to dismember the NPCs you kill.
However, just like all the previous, Germany didn’t take kindly to the violence and changed all the characters like the enemies and even the main protagonist into robots. Evidently, this wouldn't make much sense in the continuity of the game so the change the narrative slightly on the German version too so that its set in a different universe was androids try to invade earth.


You will need the net of the object first, so you make the seams and then unwrap it. Then give the object a material.


2) Make The Setup
There are 3 different screens you need. First, you change the screen to Texture Paint, which is where you do colouring of an object. Then you make a second page, then change the menu to the UV Editor, which will show the net of the object. Then you make the third page and change it to the Nodes Editor menu.


3)Add An Image In The UV Editor Menu

This creates the texture for the object, which is what allows you to pain on the object.
4)Add The Image Texture Pannle In The Nodes Editor And Then Link It To The Main Colour

First, you Press Shift A, then you go on Textures and then Image Textures.

Once you do that, you lick the icon on it to add an image to it. This is where you add the textures that you created in the UV Editor. This allows all of the paint on the texture to be visible on the model.
5)Paint

After all of that, you should now be able to paint on the object using the colour pallet and so on.
Extra
With experimentation, I found out you can easily design the image texture on any image editor, like Photoshop. This is because the image texture for the UV paint will save as a png, meaning that you can open it in Photoshop and thus edit it in any way. All you have to do is to look at the net of the object and do whatever edits you want. Such as adding the textures Photoshop has or adding images like logos.


Reflection
I found learning quite intriguing but also confusing a first when reading from the sheet given to me, however, after finding a video that clearly quicky explained it, I managed to catch on to it without any issues. I will now be using this skill in the future when I have to make clothes for my models or just have to design any object I make.
I'm especially happy with how making a custom design for the net on Photoshop came out. It fit perfectly around the cube which gets me excited to possibly use this skill again as with my skils with graphic design, I would be able to have any kind of image on any object which can also increase the possible objects I can model.
Monday 30th September 2019
Video Games: Theory Lesson 3
In our last lesson, we learned about The Legal and Ethical Constraints In Games. As an extension task, we were told to create a presentation of that topic to show our understanding of it. Today, we presented it to the class.
Presentation
Presentation
PowerPoint
Script
Reflection
Personally,
I believe I didn't do as well as I could. As I feel like I didn't sate my
points clear enough and my PowerPoint itself isn't as good as
I wanted it to be. This was because over the weekend, I was attempting to make
the presentation on Construct 2, the 2D game creator software
we used last year, as using the tools that it has, I could make an interactive
presentation. Although, I realized on the last day that I wouldn't finish
it in time so I had to rush it on to PowerPoint. This affect how I
presented myself.
I learnt from this mistake and I realise now if I'm going to use a more complicated method of generating any piece of work, I have to ensure to give myself more time to work on it, as I believe I overestimated my ability which caused me to not work on it as much as I should of. I also should have at least created a basic base for the whole presentation from the start so any changes that needed to be made (such as me switching programs) I would still know how I would structure it all and that would allow me to practice more. I will remember this and take it into account if I should try to use Construct 2 again.
Tuesday 1st October 2019

We then were given another task. We had to go to the site called Quickposes. Quickposes is a tool that artists, illustrators or anyone can use to generate many different images of many dynamic poses to improve their drawing by understanding the aspects of the different poses.
Our task was to get 4 different poses and try to draw them with the techniques we have learned so far.


This was the first drawing I made for the task but also was the worst in my view. I managed to get the pose and basic structure of the women's body. However, the issue with the daring is that I failed to get most of the distinctive detail of the outline that defines the female body, such as the legs and arms as mine is more straight and flat. The other thing is that it was very difficult to draw the head as most of it is covered by her hair.
So From this, it's clear I will need more practice forming the female body along with defining hair details.


This is my second drawing and is the second-best for me. The few issues with it are that certain details like the head arent completely accrete, the body seems to be a tad fatter and the angle of the raised leg is a bit off. Other than that, I managed to copy the pose very well and I got all the minor details implemented such as the creases within the clothing.


This to me was my best one of the bunch. The pose was done very accurate, and the clothing with its details was done well. However, I couldn't draw the hands and fingers from this view as its a very small and distinctive detail to draw that I just couldn't replicate. Drawing the head want bad but it came out more cartoonish which wasn't what I was going for.


I believe this drawing is quite a mixed bag. The male part of it is quite accurate but just like the first drawing, I struggled to define the feminine features of the body and it results in them looing bigger which doesn't fit.
Drawing Fundamentals: Lesson 4
Dynamic Poses
Now that we learned how to form the front and side of the human figure, we now started to learn how drawing it in different views and poses, again using Andrew Loomis technique. He used something called the box method. This is where you draw two parallel lines and join them together to make a box and then draw lines from one corner to the other to make a cross. You draw the parallel lines inwards ( having the bottom be thinner) when it's from a higher view and vice vera for a lower view. The point where the cross meets in the centre of the drawing.

I started off with a top. I managed to do it with ease as is was the same principles as drawing the front view. Then I drew it again but from a bottom view. This was more difficult as it was different from the front view where the chest was in front which is what I got used to. Now from this view, the feet are in front first. Although I still managed to make a decent first attempt at it.
We then were given another task. We had to go to the site called Quickposes. Quickposes is a tool that artists, illustrators or anyone can use to generate many different images of many dynamic poses to improve their drawing by understanding the aspects of the different poses.
Our task was to get 4 different poses and try to draw them with the techniques we have learned so far.


I believe this drawing is quite a mixed bag. The male part of it is quite accurate but just like the first drawing, I struggled to define the feminine features of the body and it results in them looing bigger which doesn't fit.
Reflection
While drawing the human figure from different views and poses is a more difficult task then just drawing the front and side view, I believe I made very good first attempts. The box method may take a bit of getting used to however with just more practice, I'm sure I can master it soon. There's also other key things that need more practice, such as me female drawings, outline detail defining and making my face dawings much more realistic.
My drawings from Quickposes came out much better then I thought they would. I again used the method of drawing whats in front first. So I do see my improvement as now I've become more critical in how I construct a drawing rather than just going into it blind. It appears that when it comes to using a reference, I am more comfortable and objective with my drawing rather then when I'm trying to do so from abstract.
Thursday 3rd October 2019
Blender Session 4


Delete the cube as its no longer needed, move the model on the z-axis to place it on the red line which will make it stand right on the floor. Click Cntrl+A to open the apply tab were you have to click on Location and Scale. This sets the models current size and position as its original one, which will make rigging easier later on.

Press Shift+A to create a Single Bone Armature. Drag it up on the z-axis until the bottom point is on the pelvis. If the single bone is hard to see you can turn on its x-ray to make it easier to view. Go on edit mode and click the top point, then move it down the z-axis until it reaches roughly where the belly button would be.

Click the top point and extrude it on the z-axis up to the top of the chest, then extrude that to the end of the neck, then extrude that to the top of the neck and extrude that up till the top of the head. This is the beginning of forming the skeleton.


Duplicate the finger bone to the thumb in the front view and shape it to fit. Then go to the side view and make sure it lines up. When it's correctly placed, press W and Subdivide. This will split the bone into 2, which will allow the thumb to bend.


Step 6
Make the leg bone.


Check to see if the skeleton is working so far.


Press Ctrl+Tab to enter in Pose Mode. This allows the bones to move how they would realistically depending on how you joined the skeleton. You can check how you have done it by selecting bones like the hand and trying yo move or rotate it. seeing if the whole hand moves or rotates, then it has been done correctly. You can use this to check all bones.

Click the bone tab while having a bone selected, and you will be able to rename it

For the symmetrical parts like the arms and legs, you end the name with .L (with l bing capital). This is because when you eventually duplicate the arms and legs to the right side, it will change all the L's into Rs. Making it easier to identify them.
In simple terms, the Inverse Kinematic set up allow you to set certain bones to be able to manipulate other bones in different ways. For this case, it will be used on the legs as it will allow for more refined control over them as the leg is very rigid in its current state.


Second, select the bone near the ankle and then the lower leg ( in that order) in Pose Mode. Press Ctrl+Shift+C to open the Add Constraints menu. Click on Inverse Kinematics.

After that, only select the lower leg bone then go to the bone tab. Where it says bone, set it to the pull target bone. This will cause the bones to shift forwards tilted. To fix this, set the Chain Length to two. This tells the IK that there are two bones in the leg.
Then set the Pole Angle to 90 degrees as the foot bone angel will be off.
At this point, the IK system is set up. Using the two IK bones, you can control the leg. However, currently, it doesn't move correctly, bending too far at the back and too fluid in general.


It took a while for me to get tight but after a few attempts and adding more bend to the leg, I was successful. The leg now moves realistically to how a normal one would.

Step 10
Set the foots rotation.

Currently, the foot rotates along with the leg, which isn't preferable as it takes away some control. Click on the foot bone then the IK bone in pose mode and click Ctrl+Shift+C and click copy rotation. This will allow the IK bone to rotate the foot instead of the leg.
Set the foots rotation.

Now all of the bones have the correct position and properties, you can now make the right side of the skeleton. Go to the front view with wireframe mode on. Set the 3D cursor to the centre with Cntrl+C. Then duplicate the bone on the Y-axis by pressing 90. This will rotate it 90 degrees to the right. Then make sure all bones that are twisted are equal with Ctrl+N in edit mode with all bones selected, then press View axis.

Then with all of the fight bones selected, you press the Armature tab and Flip Names. This will turn all the bones that names ended with .L into .R. And now the whole skeleton is compleated.

Pair the bones with the model.
In object mode, select the model and then the bones ( in that order) and press Ctrl+P. Press With Automatic Wights and now the bones and the model are linked.

The issue I had here was that for some reason when I moved the left side, the right side wouldn't move also and the right side didn't move at all.


But when I found a video explaining how to make your own custom one, I was highly integrated. It took a while and was a little overwhelming some points, but besides that, I barely had any struggled and I'm proud of how I took the challenge of creating the rig myself and I'm proud of what I accomplished.
I plan on developing this further by trying to make more complex and abstracts Skeletons the future.
Monday 7th October 2019
Video Games: Theory Lesson 3
Censorship And Localisation
As we learnt about Legal and Ethical restraints in the game industry, we started to learn about what restraints can lead to, which are Censorship and Localisation.
Suppression of content that is considered obscene, offensive or politically/socially unacceptable. This can be:


Limiting access to video games in particular territories.
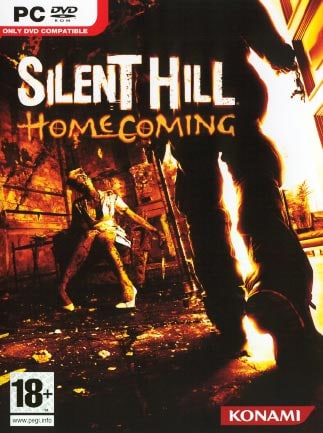
The distribution of Silent Hill: Homecoming was banned in countries like Germany and Australia due to this graphic content.
Censorship
Cutting or changing content outright
This can be seen in games like South Park, where it shows an interactive abortion scene. This was cut in the Europe version and replacing it with a still image with a message.


Regulating content to adhere to ratings
In Mortal Kombat vs. DC Universe, 2 scenes can be triggered by 2 different characters where they shoot other characters in the head. However, the developers wanted to get a T rating in North America so that their game could sell more. So they altered the sense to not actually show the headshot.


Limiting access to video games in particular territories.
The distribution of Silent Hill: Homecoming was banned in countries like Germany and Australia due to this graphic content.
Localisation
Translating text and dialogue.
This is in games like Kingdom Hearts where its original language for text and dialogue is in Japanise but when its Europe version realises it all gets adapted to English.


In Tokyo Mirage Sessions they wanted to change the age of a particular character due to the characters age along with her role in the game appearing questionable to western audiences. So they got the voice actor to re-record certain lines such as the character saying shes 18.
Creating new packaging assets and materials.
In Fatal Frame Maiden Of Black, the player can unlock extra costumes if they complete the game in the hard difficulty. However, when it was released for western audiences, they were given different but unique clothing alternative to the original due to how revealing they are.


Adding/cutting/changing content to adhere to different cultural norms.
In Oddworld: Abe's Oddysee the species of the main character, Mudokons, normally have 4 fingers. However, in Japan, the gesture of holding up 4 fingers is seen as derogatory as it's used against a social minority called Burakumin as it used to call them a 4 legged animal. So they changed it to 3 fingers.


The gaming industry is a community that is greatly affected and restricted by Legal and Ethical constraints. This has led to many different games being altered, changed or even banned for many different reasons. This is called Censorship and Localisation. Here are some case studies of games that have been affected by theses.
Changing Characters Into Robots(Case Study 1)


Censorship And Localisation In Videogames
Germany tends to have strict opinions when it comes to violence in videogames. Even banning the distribution of some like Silent Hill: Homecoming for that exact reason. This has led to a very interesting trend of a particular method of censorship through different games. One of which is turning characters into robots.


This was so that whenever any characters die in the game, instead of releasing blood and guts, they release mechanical parts and fire.


Soldier of Fortune II (2002) is another first-person shooter. The uniqueness of this game's violence is that it allows the player to go as far as to dismember the NPCs you kill.


Personally, I believe these choices to be both interesting and poor. One hand, making characters into robots could make certain games more interesting like for Turok Dinosaur Hunter as now the games get you to fight both dinosaurs and robots which in some peoples eyes, enhances the narrative. However, the choice to change characters these ways is a very indolent attempt to make them more appropriate. As when you play them, it becomes very apparent that there out of place like Soldier of Fortune II, to the point where they have to alter the plot for it to remain consistent with its logic when juxtaposed with the change. Also preventing the people in Germany from getting an authentic experience. Even so, the lack of blood and gore doesn't really change the violent actions of the player, reverting the point of making these characters robots null.
Ultimately, this is an example of both Censorship and Localisation. Censorship as this is all based on Germany's belief that these games weren't fit for their society,s eyes in their initial states. And Localisation as the games were specifically altered for only Germany. This is down to ethical constraints as the developers of the game were restricted by the view of violence from Germany.
China's Community Regulation(Case Study 2)
China is known for having very strict rules and regulations with what kind of media comes out in their country. To the point that in 2000, the distribution, sharing and ownership of any gaming console were illegal until 2015 where it was lifted. This is due to China's extreme desire to not corrupt their National Unity, culture and reputation, and they believe that games have a great effect on these. Not surprisingly, this has also lead to many different violent games to be heavily censored there in particular ways that appear to be an attempt for the games to not have an effect on the mentioned things.
No Blood
PUBG is an online multiplayer battle royale. You can traverse through the map, find other players and kill them. However, similar to Team Fortress, China didn't like the blood splatter. So instead, they changed it to a green aura.


This was possibly their way of limiting any influence of violence as the green aura makes the game less serious and emphasizes its fictionality.
No Skeletons
In World Of Warcraft, there is a section where there is a circle of skeletons. This was replaced with models with actual flesh


This kind of thing extended to the point where games like Wizard 101 where there were characters that where skeleton-based, were remade to have flesh.


This is also similar to my previous case study as they change the literal models of the characters to censor it.
No Nigth Clubs


In the game Rainbow Six Siege made by Ubisoft, there is a map that appears to resemble a typical nightclub. Multiple things were censored out things in the location.

Certain Icons were changed like the Close Combat one was turned from a knife to a fist and death icons from a skull to a cross.

They changed the design of a skull on a wall to a head with sunglasses and a balaclava.
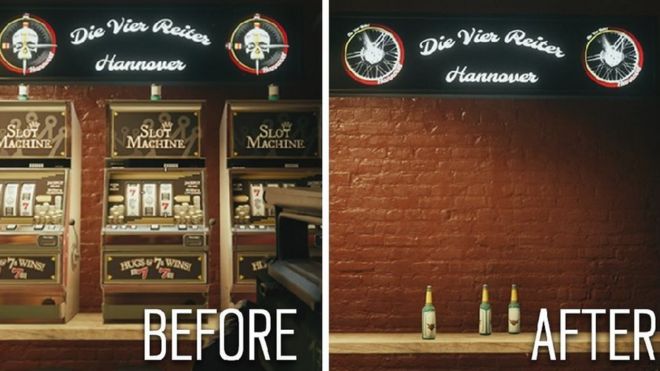
Slot machines were removed. This is possible due to China's strict gambling laws most preventing the glorification of it.

A neon image of a pole dancer was replaced with just a hand.

Lastly, blood splatter on walls was also removed
Personally, from my western perspective, I believe all of these censorships are completely unnecessary. While they may only be small changes, they are still small details that help give the game its personalities. I especially don't agree with them going to the point where they change literal character models like in Wizard 101, as it taints their original concepts. But then one I disagree with the most is what they did with Rainbow Six Siege. Ubisoft made the censors in the game to cater to China's censorship requirements. And instead of creating a separate rendition of the game like most of the other games do, Ubisoft decided it would be better to have one universal copy, meaning that people who don't live in China still have to experience the toned town content. They try to justify the change by stating “We are adjusting art and visuals, but are not compromising what makes Rainbow Six Siege the game you know today.” While I agree that the changes they made to the game don't affect much of it, I do have a problem with it mostly because the original designers had a vision for the art, only for it to be changed and removed just for political correctness. And these small changes help take the character and atmosphere from the map.
Ultimately, this is an example of both Censorship and Localisation. However, it leads more to Localisation. As Ubisoft specifically changed the game for everyone to fit China standards. Showing it was flued by both ethical and legal constraints, as they needed to alter the game to fit China ethics on its content but this choice was also made so they could legally release it in China in the first place.
Bibliography
Stewart, D. (2016). Gazette Review. [online] Gazette Review. Available at: https://gazettereview.com/2016/04/games-like-team-fortress-2/ [Accessed 13 Oct. 2019].
Dorkly (2016). 5 Weird Ways Germany Has Censored Video Games. [online] Dorkly. Available at: http://www.dorkly.com/post/80945/germany-censorship [Accessed 13 Oct. 2019].
Cowan, D. (2015). Remastered Turok: Dinosaur Hunter launches for PC this week. [online] Yahoo.com. Available at: https://finance.yahoo.com/news/remastered-turok-dinosaur-hunter-launches-225731321.html?guccounter=1&guce_referrer=aHR0cHM6Ly93d3cuZ29vZ2xlLmNvbS8&guce_referrer_sig=AQAAAG7AAaUW-rOiL9MO_BwtGS1WKhnD3JXMt5VRUZkddrRrJVxXHtkmIQdblwEkrgPXl2VsECdbrZa22W9TsAuB25ZgfNdunamRTB0i6yL26CpZ4En7QdryijdyqFBDor0Gj__pQgR_Tc7rdzpDgkHtoyVEFStqpSUsY79Nk8D1fpOk [Accessed 13 Oct. 2019].
Aktuálně.cz (2007). Soldier of Fortune II. [online] Aktuálně.cz - Víte, co se právě děje. Available at: https://zpravy.aktualne.cz/soldier-of-fortune-ii/r~i:photo:83307/r~i:article:406728/ [Accessed 13 Oct. 2019].
Elyda (2019). PUBG Renamed As “Game Of Peace” In China To Be less... [online] Fly FM. Available at: https://www.flyfm.com.my/pubg-renamed-as-game-of-peace-in-china-to-be-less-violent/ [Accessed 12 Oct. 2019].
ampedup1 (2017). Rush and shoot so the blood is splashing everywhere! | PUBG *Kill bill bloody*. [online] Imgur. Available at: https://imgur.com/gallery/skf6KOj [Accessed 12 Oct. 2019].
Ohannessian, K. (2012). What “Wizard101” Gave Up To Break Into China: Exposed Bones, Points, Gold. [online] Fast Company. Available at: https://www.fastcompany.com/1816849/what-wizard101-gave-break-china-exposed-bones-points-gold [Accessed 12 Oct. 2019].
Player anger over Rainbow Six Siege changes. (2018). BBC News. [online] 5 Nov. Available at: https://www.bbc.co.uk/news/technology-46071879 [Accessed 12 Oct. 2019].
Good, O.S. (2018). Rainbow Six Siege content censored for China launch, angering fans. [online] Polygon. Available at: https://www.polygon.com/2018/11/3/18058884/rainbow-six-siege-censored-china-pc-ps4-xbox-one-ubisoft [Accessed 12 Oct. 2019].
ESCalation (2018). Censoring Video Games for China will be the Norm! YouTube. Available at: https://www.youtube.com/watch?v=BUTjtwdOr9g [Accessed 12 Oct. 2019].


They changed the design of a skull on a wall to a head with sunglasses and a balaclava.

A neon image of a pole dancer was replaced with just a hand.

Lastly, blood splatter on walls was also removed
Case Study 1
AlternateM (2016). Steam Community :: Guide :: The Ultimate Robot Guide for MvM. [online] Steamcommunity.com. Available at: https://steamcommunity.com/sharedfiles/filedetails/?id=317975919 [Accessed 13 Oct. 2019].
Dorkly (6AD). 5 Weird Ways Germany Has Censored Video Games. YouTube. Available at: https://www.youtube.com/watch?v=9niDM9qmaS0 [Accessed 13 Oct. 2019].
Gamewatcher.com. (2015). German Version Robots - Turok: Dinosaur Hunter [2015] | GameWatcher. [online] Available at: https://www.gamewatcher.com/mods/turok-dinosaur-hunter-2015-remaster-mod/german-version-robots# [Accessed 13 Oct. 2019].
Case Study 2
Abacus News (2019). Four ways games are censored in China. YouTube. Available at: https://www.youtube.com/watch?v=bcDA-9RbiIU [Accessed 12 Oct. 2019].


Then I drew a looking up view. This also came out well, however, I believe I need to work on correctly drawing the jaw in these different positions.
Next, we learned how to form a basic human skull. Learning how to draw one is useful as it helps the brain to understand the structure and form of the human head and how everything is connected.


My first attempt went well however it got worse on my second. Its features don't appear to be at an angle and I connected the cranium and jaw incorrectly. My third attempt was better however I still believe the first was the best. I will have to practice this more to develop a method in drawing the skull that will allow me to be able to do it quickly with ease.


We were then tasked to draw 4 different head views of the same person. So I got a spreadsheet of a person showing different angles of her head. I drew a looking down, to the right, up-left and downright.
Tuesday 8th October 2019
Drawing Fundamentals: Lesson 5
Abstract Head Perspectives
Now that we have learnt the basics in constructing the human face, today we've learnt the technique to draw a head from multiple different views. This again comes from the book Andrew Loomis made. This technique is pretty much the same as when you're drawing the face however this time when you draw a circle instead of treating it like a 2D circle, you think of it as a sphere. First, you draw a circle as if it was the cranium. Second, you draw two lines. One curved one anywhere on the side of the circle. The curvature depends on what kind of view you're trying to draw. Curved down for when the head is supposed to be looking down and vice versa. This will be the brow line. Then draw a straight line through the middle of the curved line. This will help define the jaw. Third, you mark where all the facial feature will be. Then make where the ear will be, which will be the length of the brow to the lip. Forth, draw the features and draw the outline of the head using the straight line to help see where the jaw should be.

I first tried it out with a looking down view. I got the structure right but the facial features still look as if they were from a front view.


I drew it again but now making sure all parts are altered to fit the view appropriately. I came out pretty well


My first attempt went well however it got worse on my second. Its features don't appear to be at an angle and I connected the cranium and jaw incorrectly. My third attempt was better however I still believe the first was the best. I will have to practice this more to develop a method in drawing the skull that will allow me to be able to do it quickly with ease.


Reflection
Due to the previous practice of constructing a face, I was already familiar with the method in drawing different head views and I'm pretty confident with my ability with it. However, I do need to practice more with constructing a skull. Not only would it be an interesting skill to have in my drawing ability, but, as previously stated, I could really help with me fully understanding all the factors of the human head which can help me make more realistic head shapes.
After my task drawing them for different views, I wasn't too proud of it as I didn't manage to accurately replicate how the person looks like and I believe that they don't fully convey its supposed to be a woman. And I found it really hard to draw the hair as it's all shaded in the picture and appears to be mostly solid to that's also hard for me to replicate. However, I do believe that I have got the view itself pretty good in terms of how the face is looking.
Overall, I'm comfortable with constructing the head in many abstract views, I just need to work on the jaw, skull and making more realistic faces.
Tuesday 15th October 2019
Blender Session 5
One of the most important things in 3D modelling is your lighting and camera. The lighting of the scene is what stops everything being solid colours and instead have more dept and shade. This is what gives it its realism. Your camera is what allows people to view the scene and the manipulation of it allows for a variant of camera angles/techniques like high shots, zooming, close up and panning.


When a camera is created, it has most of the same properties as normal objects in the sense of moving, rotating and scaling it. Shown by its 3D widget tool.

By pressing 0 on the number pad, you will be able to see the 3D Canvus through the view of the camera which allows you to get an idea of you will see the scene when is rendered.


Also, when in this view, if you press G, you can zoom the camera in and out by pushing the mouse up or down.
Point is the default lamp, just like any other, it lights up whatever is in its field of effect.


I had no issues learning more about the Camera and Lamp. Most of the ways to manipulate them are the same that I have already done with the objects I have used. When I eventually have a finished rendered scene, I will be using the skills I've learned today to make an animation with at least 3 different camera shots and lighting effects.
However, I do need to practice more with the lamps just to fully understand what lamp is the best to use for what purpose and to understand how to use the Area lamp.
Now that the Human model is fully rigged, it can now be animated. But before animating with a rigged mesh, its recommended to go over the Weight Pain of the skeleton. The Weight Pain is the area of effect each bone has. It determines how much of the area it affects and the level of the effect it has.

This is important as when the skeleton is linked with the mesh, it automatically creates weight paints for all bones, but some may have not been done in a way that suits the model. For the human model, parts like the arm bones could affect more than they should, like here how the side of the torso is being affected when the upper arm bone was rotated up.
Weight Panting

To enter Weight Paint mode, you can select all the bones in pose mode, then select the model and use the Mode Selector Panel to select Weight Paint. Selecting the bones in pose mode first is important as it will allow you to move them at any time to test them as you edit the weight paint.

In weight paint mode the model will turn blue. Each one you select will show the area of effect it has to throw the use of various colours that are spread out. Whatever is coloured in the area is how much will be affected when you manipulate the bone and each colour represents a different level of effect the bone has. Red and oranges mean the area will be greatly affected while blues and greens will have a very light effect.
On the Tools Panel. toggled bt pressing T, you can press the brush icon which will bring up different brushes you can you. The main ones people use are Add and Subtract.


Add allow you to pain the area you want the bone to effect. The move you go over the pain, the more the colour will change to red and thus increases its effect.

Subtract is an eraser for the pain, eliminating any effect the bone previously had in that area.
I edited the paint of the shoulders as they were having too much effect on the side of the torso. I also edited the lower leg bone so that the kneecap wouldn't be as sharp.


The one issue I ran into is that I didn't know how to mirror the edited weight paint for all limbs. The video I watched, the author somehow still had the mirror modifier on his mesh so all his edits were mirrored. This was confusing as I needed to assign and thus remove the modifier for my model to move correctly. I couldn't work out how he managed that though.

Then, using another video, I was able to find another method. You go to the Objects Data Pannel and view the Vertex Groups which will show all bones weight ain on a list. By selecting the bone you want to copy then click on the dropdown menu. Press Copy Virtex. Then use the menu to select Mirror Vertex Paint. After that, you can delete the original paint for what the body part had recently. Then you rename the mirrored copy exactly what the original name was.
Weight Painting was a lot harder then I imagined it would be. It appears that it's very difficult to get things to work the way you want it to. And it's very hard to tell if the weight paint grants a very natural control over the model. Overall, it appears to be a simple task but requires a lot of time and precision. Although, it wasn't hard to learn at all and while it tasks a lot of time to do, I still have little to no issues with it.
You can alter the view in different ways:
Zooming with the Scroll Wheel

Rotating the view with Alt+Leftclick


By pressing the play button on the top, you can enter play mode. Play mode is where Unity gives you an accurate representation of what your final game will be and allows you to play it. However, any changes or actions done while play mode is active does not save and will be reversed when you leave it. This is possible to prevent the loss of objects initial states if you should ever leave play mode while a game is running.
3)Game
The Game window shows you a preview of how the final game would appear in realtime but doest not inherently allow you to play it without being in play mode.
4)Inspector
The Inspector panel gives you all the information associated with an object when it's selected.
5)Project
This panel is where all assets of the project reside. Such as audio, video, scripts and many more different files.
6)Console
The Console section is where you can paste information from your code such as the value of different assets to help track if you have any bugs that are causing unintentional things to occur. This is also where error messages will appear if you ever try to play the game while there are errors in your code that are preventing it from running.
After learning about the interface, we go on to our first task.
We were given a sheet with instructions on how to create a very simple game where balls spawn from the top and you have to click them before they reach the bottom.

First, you can create objects in Unity by hovering over the Create tab which allows different types of objects. Hover over 3D Shapes and you will be able to select a sphere.
Then you give it a material by right-clicking in the assets folder on the Project panel, hover over Create and select material. Materials are the same as they are in Blender, where they are the added surface of an object that can be altered.
When it's created, you drag it to the sphere to apply it. You can change the colour of the sphere now (on the Inspector panel with the material selected) using the colour pallet that is parallel prom the word Albedo. You can also give it an image texture by pressing the I sext to Albedo and you can use any image that has been added to the project.


Then you need to add a Rigid body Component to the sphere by selecting it and clicking component on the Inspector panel. Components appear to be properties you apply to an object to affect the way it works. Click Physics and Rigid Body. Then change the Mass to 0.5 and drag to 2.5. Then add a Sphere Collider component. This is all to define how the ball with fall
After that, we added our first Script. Unity uses the code C#(pronounced C Sharp) and the code are put on scripts which are, more or less, text files that contain writing formatted with the C# code and Unity reads it and allows the game to do whatever was coded to happen.

In the assets file on the Project panel, we made folders for specific file types. We made one for scripts. Because we don't have the ability to code at this moment, we were given premade scripts for different actions in the game to work with. However, I manually copied one of them in order to gain some understanding of all the key phrases and format the C# code uses. This script is supposed to control the spawning of the balls

Then I added the spawner and clicking script to the ball and tried turning on play mode. However, from reading the pop-up message and the notification on the Console panel, it appeared there was an issue with the code for the spawning. It said that the lines 8,5,16 and 18. So I went over the code and checked if it matched the sheet I was given that also had the code on it. I couldn't find any disparities.
Ultimately, I had to just use the pre-written file as I wasn't sure what was wrong with the code which was quite disappointing as it would have liked to have achieved the task with writing the code myself however I didn't want to dabble on it for too long.

Once I put in the script again and activated play mode, it appeared to be working, shown by how the coordinates of the ball were changing, and no errors appear. However, I don't see the ball in the Game window.

Then I realised it was because of the Camera as the screen for the Game Window shows whatever the camera sees. So I moved the ball in the camera's view.

At this point, I managed to get the game half working. The ball managed to go down however it doesn't spawn any other balls.

So I checked the Console Panel again and it states that the Spawner Script is not running despite me assigning it to the ball.

Then I realised I missed a step. I was supposed to create an empty object on the Hierarchy Panel and name it Spawner and assigned the Spawn Script to it.

It appeared to spawn balls, but instead of spawning from the top, it kept flashing in the middle.

Then I realised it was because I didn't set the spawn points on the Inspector Panel and I was supposed to set them all at 9/-9. This determines where the balls will fall from.
After doing that, The spawning and falling of the balls appear to be working.

Now that was done, I finished off with making the HUD(Heads Up Display). I created a few more objects in the Hierarchy. I made a Canvus, which acts as the screen for the game and the Camera's view is set to be through the whole Canvus by default. I renamed the Canvus to HUD. I added a Text and placed it on the top left. This will represent the player's score, I named it ScoreText.
Then I made 2 more Textes and placed them in the centre. Both represent the text that will appear when the player either fails or succeeds.
For a visual representation of the time limit, I added a Slider and placed it under the ScoreText. The Slider will have the bar consistently go down or up along with the increasing of decreasing number(or timer) you have assigned to it.
After that, I added the script for the scoring system to the HUD. and Added the Timer script to the project itself.


Finally, after all that, I ran the game and everything is working.

This task was quite difficult at first. Trying to copy the code without making a single mistake as a simple incorrect casing of a letter can mess up all of the code. Reading through it all was tedious which got me to just use the pre-written code. But even after using the prewritten code, there were still issues to which I was confused about why it was occurring.
It was getting quite stressful, but after taking a break and going through the instructions of the sheet again step by step, I managed to break it down and eventually discover the problem and succeed.
My first impression of Unity is that I look more complicated then I imagined it to be, but as I took my time and tried to understand what I was doing more, I goy more and more intrigued by it. What I like most about game engines like Construct 2 is that its logic-based system allowed for very abstract and creative ways to construct a game. While now having to physically write code may make things more difficult, It does also grant much more control in the games I make as I would literally be writing for It to happen.
I am very excited to learn more about this application and I aspire to be proficient in the C# code.
An example of an Auteur is Zack Snyder, who directed 2016 film Batman V Superman. He's known for his different portray over the character of Batman. Having the character divert from the way that Batman is consistently written to be. In an interview he did where he explained his reasoning behind his portrayal, he stated that he Belives the way he directed it is a realistic depiction to how Batman would act based upon his interpretation of him. Thus showing he injected his own philosophy into his directing, drastically changing the mythos of the story to the poi that he became more of the author of this adaption than the original creator.
While the Auteur Theory is normally seen in the film industry, It definitely can be applied to games as well. Many game directors have certain philosophies that they apply to most of the games they create which is a common trait of Auteurs.
An example of a game Auter is Tomonubu Itagaki. He's known for games like Ninja Gaiden, and Dead or Alive series. His gimmick is that he normally made his game have extreme difficulty specs. In the Ninja Gaiden game, the player was able to play an easier version of it but would also have the consequences of the characters model having to wear a pink bracelet. This is a clear indication of how he feels about gamers who like to take a more easier and laid back approach. This is a clear example of his Auteurism.
Reflective Report
The creative industry is a very wide and broad community having a massive effect on society. One of the most notable aspects of such creative products is how writers/ Directors can inject their own creative liberty into their work to express messages, lessons and meanings. This is especially potent in games as not only can a message be shown through the visuals and audio, but can be experienced through the physical gameplay. Having an interactive element that no other medium has.
I have played many different games that have resonated with me with the subtext of their stories. Some have even taught me some lessons through my own childhood;
Tomb Raider Trilogy: In these games, the archaeologist Lara Croft goes through different adventures, involving deadly creates and supernatural enemies, to find the truth with what happened to her parents. In the second game, she gets a hunch her mother who she thought died, was possibly alive. So at the 3rd and final game of the trilogy, she goes for one last crusade to find the truth. At the end of the trilogy, she finally discovers her mother is actually dead and she had to come in terms of that.
The messages this game gave off to me, is that if one is adamant enough to find the truth, they have to be prepared to find out the worst. And that no matter how much we wish for things, life doesn't always grant you your desires.
Infamous: This game has many different messages under the story
A man called Cole, with electromagnetic powers, aims to restore order to Empire City. Through the game, the player is given the freedom to use their power for good and evil purposes. The way you use your powers determines how the public views you and your growth in the game.
You are forced to make choices in certain instances, some being ultimatums. Such as the part where Coles love interest and a bunch of civilians are abducted and hung from a building. You have to decide to either save her and let the people die or vice versa. But the twist is that his love interest is actually with the civilians and will die either way.
And at the end of the game, you find out that the main antagonist was a future version of Cole.
The first messages this presents is that our actions have consequences. That we will all be held accountable with the things we do so we must act in the way we want people to see us. The second message is that you should make your choices selflessly otherwise you can cause a much worse situation then you wanted. And lastly, the final message is that sometimes, we are our own worse enemy. That we sometimes cause the most harm and complications to ourselves and its important to fight against that part of yourself.
Until Dawn: In this game, the main characters pull a prank on one of the other characters that lead to that character's death. This eventually causes a traumatic night for the cast as the character who dies turns into a "Windigo", a devilish creature, and tries to hunt down everyone, who are stuck on a snowy mountain. The whole game is about what choices you make and they all have a huge impact on what happens in the story.
This kind of system is actually referenced in the game as the Butterfly Effect. And the idea that the player's choices affect events is shown throughout. Such as in the first part of the game, where one of the characters called Chris sees a squirrel while he's holding a gun. You get the choice to shoot it or spear it. If you spear it, then nature remains in balance and later on in the game were another character called Sam is running from someone trying to capture her, she gets a chance to hide as long as the player plays it well. However, if Chris shoots the squirrel, nature attacks back with the crow scratching Sam. So later in the game with the same chance scene, Sam's wound from the crow opens causing her to leave a trail of blood, revealing her location and thus preventing the player's ability to make her hide.
The messages of this game are that karma comes to bite us all. Our actions no matter how small they are can drastically change the events of your life. That we all sometimes have to answer back to what we have done. Very similar to Infamous
And moments like the different events that can happen at various story points with Sam, dependent on what Chris does teaches the lesson that our actions can have great effects on other people. That even if we aren't directly harming another, we can still indirectly cause them pain.
Auteur 1: Auteurs convey their messages in different ways, some being more personal to the director themselves, such as Lorne Lanning; a director who makes games that are allegories of the issues with the world. Not only does this help covey their point more with focusing on a particular theme through different games, but also screams out to players of whose work it is. Like as if it's a metaphorical "mark" that people can see and recognise who was responsible for it.
I consider him an auteur as most of the games he's worked on are a part of the Oddworld series, featuring some of the same characters and all exploring the same theme in different ways. All explore the theme of how corrupt industry can be and that regardless of if they are just doing a job and providing for people, they can still be doing morally incorrect things. As in each game, the main character Abe has to work to save many living beings from being enslaved or becoming food. These games also follow the theme of karma just like Infamous and Until Dawn, however, in this case, they focus more on the concept that if you abandon or go against your comrades, it can come back to bite you. As in all games its possible to get a bad ending due to the player not saving the various characters they can optionally save. Leaving them to see the people he was supposed to save abandon or go against him to leading him to die in horrific ways. All these are present in all games, showing that Lorne Lanning is really trying to hone in on these themes and that's the mentality of an auteur.
Auteur 2: Another auteur is Marc Guggenheim, who was the writer of the X-Man Origins: Wolverine game that was an adaption of the movie.
I consider him an auteur as the game is drastically different from the movie. From the setting, being grimier, the graphic imagery with there being a lot more gore and horror but also the story itself. In the beginning, the main protagonist Wolverine has to escape a facility that has trapped in. In the movie, he got out without much issue, but in the game it gets Wolverine to fight an army of enemies and have many different interactions before managing to get up, upstaging the action. Another part wherein the movie, Wolverine has a short interaction with a character called Gambit. The game made it an entire chance sequence. Scenes are different, a lot more additions are in the game and it has a lot more emphasis on the violence. What makes this a work of an auteur, is that he took something made by something else, and drastically changed it that makes Marc's work on the game a lot more unique to himself and makes it easier to credit him separately for it regardless of the original director. These changes can also help spread the message of the story better, that the world Wolverine lives isn't a pleasant one and how he's not a typical hero based on his methods on how he deals with his enemies. That's why I believe Marc Guggenheim is an auteur.
Overall Point: I believe games are very effective at conveying messages at a large sufficiency. Gaming is a large medium that message can spread through billions As previously mentioned, games have a factor that no other median has, interactivity. Because the person has to play through the game, the events that happen in it can be a lot more personal, especially with games where you have to make choices as it can make the player feel whatever happens is their fault.
However, I do believe games can do more to make these messages much more impactful. Games should try to their messages within the physical gameplay more. Using the previously mentioned games as examples, Tomb Raider's messages is within the story, mostly only being sufficient enough to be something enjoyable to watch. And people who aren't interested in the stories of the game wouldn't be effective at all. However, games like Infamous has most of their messages in the gameplay itself. Making it more of an experience rather than a story that you see. It also forces the player to know and understand what the game is trying to say as you cant escapes experiencing how the game is designed. This, in my opinion, will really help boost the effectiveness on how videogames can convey their messages.
Conclusion: This topic is very intriguing to me and has gotten me to really think about how I should make my games in the future. Not only for this course but as my career in general. I'm aware that for my final project, I will have to choose my own theme and make a game based upon that. Having to do a lot of research and development. Now I know how much more effectual my project can be if I take deep thought with what my message will be. And now that I have gotten a better analysis of how a game can effectively convey a message, I have a better idea of how I will go about it. When I'm planing what kind of game my project will be, I will take deep though on how to implant it into the gameplay. Thus not only helping me break down to what my game will be for planning but also boosting the whole theme of it also. And finally, I am thinking of how I can become an Auteur myself. If I can create my own theme or style that can remain consistent through all my future projects. Allowing my messages to be more recognisable and thus more potent.
With the ball game complete, we were now set another game project task to do. This will be a game where a character is in a large environment with a mini-game of pushing a ball on a goal.

First, we create a Terrain object on the Hierarchy. The terrain object is a flat sure that represents the surface that the character would be walking on.
With the Terrain selected, go on the paint tab on the Hierarchy. Here, you will be able to manipulate it in multiple ways.
Clicking the dropdown menu under the Terrain tool pannel, while having the paint tool selected, gives you different options. With Raise or Lower Terrain selected, you are given a brush which can drag parts of the surface up. This is very useful if you are creating things like mountains or any kind of object that is connected with the earth. Holding Left click while dragging up on the same area allows the section the brush is on to extrude upwards. Left-Clicking while dragging the brush allows a more subtle extrusion over the surface it paints over. This can be useful for making rough and rocky surfaces.


Next, selecting Paint Texture in the dropdown menu will allow you to add colour and texture to the Terrain. Clicking Edit Terrain Texture and then Create New Layer will bring up a panel where you can select ant image in your project file. Whatever image you select will be spread throughout the surface of the Terrain. Doing this again but selecting another image will add that image to the Inspector panel along with the previous. Now by clicking either image, you can paint over the Terrain with that image. This can be useful when you're designed the surface of the ground such as making it look like grass


After that, you can add Trees. To do this, you have to add tree files on the project file and then click on the Paint Tree tab on the toolbar. Then press Edit Tree. This will allow you to select one of the trees in the project file. After that, similar to the Paint Texture, you can paint trees on the Terrain. Simply clicking allows you to paste whatever trees you added. You can change the number of trees you paste using the brush size, the size using the tree hight and are various other things you can alter about them.


Adding the character comes next. I added the character file I was given that contained all the information such as the characters animations, button prompts and the model itself. Then I dragged the file for the character on the Hierarchy, which adds it to the 3D canvas, then organise its position and made sure the camera was pointing at it. Then I dragged the Material for Ethan's clothes by dragging it onto him. At this point, the Terrain and the Character is compleated.


Next, you set up the physical objects which are the ball, cube and mase. You create a sphere, give it a material, then add the Rijed Body component to it which will allow the player to push it. Create a cube and also give it a material, then make one more cube but scale it to be as thin as a wall. Then make different copies of it and place them to form a mase.
Then you make the buttons and triggers that Eathen will use for the game. There is supposed to be two types. One that's supposed to be a hazard and another that will spawn the ball from the box. To make the former, I created 2 cylinders and scaled them to be flat as a circle and then added a material. Named it Danger as that's what the code will be looking for. Then I added a Plain which is mostly just a square, and give it the Rigidbody and Box Collider component with the trigger option ticked. This allows it to respond to Ethan. Then I added the script that I was given called Touch that was the code for whats supposed to happen when Ethan pushes the box on the plain. Lastly, I made another plain that will represent the goal where the player will push the ball to.


With all of that done, all that it is left is setting up the HUD. Just like last time, I just created a Canvus and added 2 texts with one being Wintext and the other Losetext. Then I added the coin/ skull images that represent the score the player has. To add them on you have to change their texture type to 2D and UI. Then I added the HUD script to the canvas and dragged all the assets that are needed for it.


Once that was done, the game was complete. Now Ethan can now push the box on the plain to turn it into a ball and push that ball to the goal to gain coins.
This task was a lot easier than the last. I managed to complete it without effort and all the instructions were clear and I followed them well. I also found this to be much more interesting, as I really enjoyed making the Terrain and being able to see the character in an environment that I created. For future 3D games, I may defend use what I learned today yo make my own leaves levels as the Terrain has many customisable properties and can easily make detailed and vast landscapes.
What I would like to improve on this is learning how to make my own assets like buildings and characters and be able to place them in Unity which will help me start with the capability to creating my own levels.
Impact On Society -Live Debate
Today, we had a live debate about The Impact Of Video Games In Society. There were two teams like the last time with one believing they have a positive impact and the other arguing the opposite. I was on the positive team. My statement was that video games can be socially, mentally and healthily beneficial and that when people correlate violence and health with games they don't always look at all the factors which make the games take more blame.
Debate


I organised the animations I was going to set on the Animator panel. Then I learnt something I didn't realise before. I appeared that by default, the Animation Parameters are set to cloud and when creating a new one, you can set it as an int. When its an int, the equals option is available in the Inspector. Meaning that was one of the issues with the previous project, so I set that discovery aside.
Lighting And Camerawork
When a new file in Blender is created, there will automatically be a camera and light by default. But if it's not, you can easily create one as if it was a normal object with Shift+A.


Camera

Disclaimer: Scaling the camera does not make its view any different.

By pressing 0 on the number pad, you will be able to see the 3D Canvus through the view of the camera which allows you to get an idea of you will see the scene when is rendered.
While in this view, you are still able to alter the camera in the ways mentioned above


Lighting
There are quite a few lamps that can be created, each project light in different ways suited for different purposes:


Sun acts as an actual Sun. It appears to lights up everything facing the Z-axis


Spot is a lamp where wherever you set its line to, it will only light up that spot. Very similar to a spotlight.


Hemi is similar to Spot. You can alter its field of effect to specific areas by rotating it, however, its FOE appears to be much greater by default.


Area is the only lamp I don't fully understand. It seems like it has a very bright FOE that expands through the whole 3D canvas that also appears to generate large shadows on different parts.


Reflection
Friday 18th October 2019
Blender Session (Independent) 6

Weight Panting

To enter Weight Paint mode, you can select all the bones in pose mode, then select the model and use the Mode Selector Panel to select Weight Paint. Selecting the bones in pose mode first is important as it will allow you to move them at any time to test them as you edit the weight paint.

In weight paint mode the model will turn blue. Each one you select will show the area of effect it has to throw the use of various colours that are spread out. Whatever is coloured in the area is how much will be affected when you manipulate the bone and each colour represents a different level of effect the bone has. Red and oranges mean the area will be greatly affected while blues and greens will have a very light effect.


Add allow you to pain the area you want the bone to effect. The move you go over the pain, the more the colour will change to red and thus increases its effect.

Subtract is an eraser for the pain, eliminating any effect the bone previously had in that area.


Then, using another video, I was able to find another method. You go to the Objects Data Pannel and view the Vertex Groups which will show all bones weight ain on a list. By selecting the bone you want to copy then click on the dropdown menu. Press Copy Virtex. Then use the menu to select Mirror Vertex Paint. After that, you can delete the original paint for what the body part had recently. Then you rename the mirrored copy exactly what the original name was.
Reflection
Friday 21st October 2019
Blender Session (Independent) 7
Now that the model is rigged and has had its weight paint checked through, its animation can now be started. I decided to do a walking animation as its something I've done in 2D before and so I can possibly put it into Unity.
Step 1
Create the workspace

You will need the screen of the model and another for the animation. The animation screen is called the Dope Sheet. Where all your frames will be.
Step 2
Create the first pose

On the side view, move the left leg forward on the Y-axis and then rotate the foot until its pointing up. Then select the hip bone and drag it down until the heal of the foot touches the line and when the leg has a slight bend. Drag the right leg back, rotate its foot to be pointing down and then rotate the toes to be flat on the ground. Then drag the hip bone slightly forward so it looks like the model is leaning in the walk.

Then go to the front view and drag the left foot a little closer to the right foot on the x-axis while also noting dow the coordinates it's moved on the bottom left of the screen. Move the right foot on the x-axis as well while typing in the same number noted down from how much the left foot moved. After that, move the left arm closer to the torso while also making the hand more straight.


Select all the bones and press I and select doctor. This will set the current pose of the model as a keyframe. Then go to frame 13 on the Dope Sheet. Copy all the bones and reverse paste them using Ctrl+Shift+V. This will paste the pose in the rever position. If you scroll through all the frames you should be able to see the walk building up.
Step 3
Then go to some of the frames in between and make sure the appropriate stages of walking are present in the animation. In the 7th frame, make the left foot flat on the ground and then have the right leg stick out slightly with the foot pointing down. Fram 4, have the foot flatter and drag the right leg further back. And Frame 10, make the left leg flatter and make the model higher by dragging the hip bone up on the Z-axis.


Step 4
Add the second step.

When you're happy with all of the frames and copy them, select it all on the dope sheet with A, go to frame 13 and reverse paste. This will copy all the previous frames but with the limbs revised and thus, the animation is complete.

Reflection
This was one of the easiest and successful things I've done in Blender so far. Once I copied the first frame on the 13th, half the work was already done and was just the case of defining some of the limbs in the frames in between. It came out really well. It contains the main stages in a typical walking animation, the arms move accurately, the feet realistically go through different angles, the upper body is clearly shown going up and down as the legs move and it all looks perfectly seamless.
I find it amazing that all of this came from a simple cube. I future, I look forward to implanting this model into Unity to get used to creating the controls of a 3D character with it. I also hope to create more animations, such as a running one.
We were introduced to the program Unity in today's lesson. Unity is a multi-platform game engine made by Unity Technologies. It can be used to make almost any type of game for both 2D and 3D. We will be going over it for the next 6 weeks so we can learn how to make 3D games in comparison to how we learned to make 2D ones last year.
We began with just getting used to the interspace.

Just like Blender, there are multiple panels and windows in Unity that you can move around to organise them that suits your preference. Each of them has its own purpose.

1)Hierarchy
A list of all the objects on the screen. Allowing you to know what's there and to be able to select objects you may find hard to find or click on your Scene.
2)Scene

The Scene view is where you place and manipulate the objects you have, such as moving, scaling and rotating. This can be done using the small tool panel on the top left which can toggle what the cursor does to a selected object in the ways formally mentioned through the use of their 3D cursor also like in Blender. There are shortcuts for theses edits with W to move, E to rotate and R to scale.
Walk Cycle


On the side view, move the left leg forward on the Y-axis and then rotate the foot until its pointing up. Then select the hip bone and drag it down until the heal of the foot touches the line and when the leg has a slight bend. Drag the right leg back, rotate its foot to be pointing down and then rotate the toes to be flat on the ground. Then drag the hip bone slightly forward so it looks like the model is leaning in the walk.

Go to the side view and position the left arm to follow the direction of the right leg. Now that arm is complete you can copy and paste the pose of the arm to the other arm by using Ctrl+C to copy and Cntrl+V to paste it to the other arm. Then position the right arm to follow the direction of the left leg.


Select all the bones and press I and select doctor. This will set the current pose of the model as a keyframe. Then go to frame 13 on the Dope Sheet. Copy all the bones and reverse paste them using Ctrl+Shift+V. This will paste the pose in the rever position. If you scroll through all the frames you should be able to see the walk building up.


Reflection
I find it amazing that all of this came from a simple cube. I future, I look forward to implanting this model into Unity to get used to creating the controls of a 3D character with it. I also hope to create more animations, such as a running one.
Tuesday 29th October 2019
Unity Session 1
User Interspace

Just like Blender, there are multiple panels and windows in Unity that you can move around to organise them that suits your preference. Each of them has its own purpose.

A list of all the objects on the screen. Allowing you to know what's there and to be able to select objects you may find hard to find or click on your Scene.

The Scene view is where you place and manipulate the objects you have, such as moving, scaling and rotating. This can be done using the small tool panel on the top left which can toggle what the cursor does to a selected object in the ways formally mentioned through the use of their 3D cursor also like in Blender. There are shortcuts for theses edits with W to move, E to rotate and R to scale.
Altering 3D Canvas
You can alter the view in different ways:


Play Mode

By pressing the play button on the top, you can enter play mode. Play mode is where Unity gives you an accurate representation of what your final game will be and allows you to play it. However, any changes or actions done while play mode is active does not save and will be reversed when you leave it. This is possible to prevent the loss of objects initial states if you should ever leave play mode while a game is running.
4)Inspector
Kip Parts


Then you need to add a Rigid body Component to the sphere by selecting it and clicking component on the Inspector panel. Components appear to be properties you apply to an object to affect the way it works. Click Physics and Rigid Body. Then change the Mass to 0.5 and drag to 2.5. Then add a Sphere Collider component. This is all to define how the ball with fall

In the assets file on the Project panel, we made folders for specific file types. We made one for scripts. Because we don't have the ability to code at this moment, we were given premade scripts for different actions in the game to work with. However, I manually copied one of them in order to gain some understanding of all the key phrases and format the C# code uses. This script is supposed to control the spawning of the balls


So I checked the Console Panel again and it states that the Spawner Script is not running despite me assigning it to the ball.

Then I realised I missed a step. I was supposed to create an empty object on the Hierarchy Panel and name it Spawner and assigned the Spawn Script to it.

It appeared to spawn balls, but instead of spawning from the top, it kept flashing in the middle.

Then I realised it was because I didn't set the spawn points on the Inspector Panel and I was supposed to set them all at 9/-9. This determines where the balls will fall from.

Now that was done, I finished off with making the HUD(Heads Up Display). I created a few more objects in the Hierarchy. I made a Canvus, which acts as the screen for the game and the Camera's view is set to be through the whole Canvus by default. I renamed the Canvus to HUD. I added a Text and placed it on the top left. This will represent the player's score, I named it ScoreText.
Then I made 2 more Textes and placed them in the centre. Both represent the text that will appear when the player either fails or succeeds.
For a visual representation of the time limit, I added a Slider and placed it under the ScoreText. The Slider will have the bar consistently go down or up along with the increasing of decreasing number(or timer) you have assigned to it.
After that, I added the script for the scoring system to the HUD. and Added the Timer script to the project itself.


Reflection
Monday 4th October 2019
Video Games: Theory Lesson 4
Videogames Coveying A Sense Of Meaning
Moving on to a very interesting topic in our theory work, we looked into the Subtex of Games. How Director's implant hidden messages in their work. We discussed the games we played and the message that they portray behind their narratives.
An example of this is the games that were made from Telltale Games. Their gimmick was to make games were the story was dependent upon the player's choices and actions. This game feature in itself underlays a huge message, which is that our actions have consequences. That one little action can change everything in your life and why it's important to make the choices in our life well thought and wise in order to create the most appropriate and preferable outcome.
A big addition to this topic was about a new a terminology called the Auteur Theory. The Auteur Theory suggests that the director, who oversees the grand vision of a story, is more to be considered the author.
An example of this is the games that were made from Telltale Games. Their gimmick was to make games were the story was dependent upon the player's choices and actions. This game feature in itself underlays a huge message, which is that our actions have consequences. That one little action can change everything in your life and why it's important to make the choices in our life well thought and wise in order to create the most appropriate and preferable outcome.
A big addition to this topic was about a new a terminology called the Auteur Theory. The Auteur Theory suggests that the director, who oversees the grand vision of a story, is more to be considered the author.
An example of an Auteur is Zack Snyder, who directed 2016 film Batman V Superman. He's known for his different portray over the character of Batman. Having the character divert from the way that Batman is consistently written to be. In an interview he did where he explained his reasoning behind his portrayal, he stated that he Belives the way he directed it is a realistic depiction to how Batman would act based upon his interpretation of him. Thus showing he injected his own philosophy into his directing, drastically changing the mythos of the story to the poi that he became more of the author of this adaption than the original creator.
While the Auteur Theory is normally seen in the film industry, It definitely can be applied to games as well. Many game directors have certain philosophies that they apply to most of the games they create which is a common trait of Auteurs.
An example of a game Auter is Tomonubu Itagaki. He's known for games like Ninja Gaiden, and Dead or Alive series. His gimmick is that he normally made his game have extreme difficulty specs. In the Ninja Gaiden game, the player was able to play an easier version of it but would also have the consequences of the characters model having to wear a pink bracelet. This is a clear indication of how he feels about gamers who like to take a more easier and laid back approach. This is a clear example of his Auteurism.
Reflective Report
The creative industry is a very wide and broad community having a massive effect on society. One of the most notable aspects of such creative products is how writers/ Directors can inject their own creative liberty into their work to express messages, lessons and meanings. This is especially potent in games as not only can a message be shown through the visuals and audio, but can be experienced through the physical gameplay. Having an interactive element that no other medium has.
I have played many different games that have resonated with me with the subtext of their stories. Some have even taught me some lessons through my own childhood;
Tomb Raider Trilogy: In these games, the archaeologist Lara Croft goes through different adventures, involving deadly creates and supernatural enemies, to find the truth with what happened to her parents. In the second game, she gets a hunch her mother who she thought died, was possibly alive. So at the 3rd and final game of the trilogy, she goes for one last crusade to find the truth. At the end of the trilogy, she finally discovers her mother is actually dead and she had to come in terms of that.
The messages this game gave off to me, is that if one is adamant enough to find the truth, they have to be prepared to find out the worst. And that no matter how much we wish for things, life doesn't always grant you your desires.
Infamous: This game has many different messages under the story
A man called Cole, with electromagnetic powers, aims to restore order to Empire City. Through the game, the player is given the freedom to use their power for good and evil purposes. The way you use your powers determines how the public views you and your growth in the game.
You are forced to make choices in certain instances, some being ultimatums. Such as the part where Coles love interest and a bunch of civilians are abducted and hung from a building. You have to decide to either save her and let the people die or vice versa. But the twist is that his love interest is actually with the civilians and will die either way.
And at the end of the game, you find out that the main antagonist was a future version of Cole.
The first messages this presents is that our actions have consequences. That we will all be held accountable with the things we do so we must act in the way we want people to see us. The second message is that you should make your choices selflessly otherwise you can cause a much worse situation then you wanted. And lastly, the final message is that sometimes, we are our own worse enemy. That we sometimes cause the most harm and complications to ourselves and its important to fight against that part of yourself.
Until Dawn: In this game, the main characters pull a prank on one of the other characters that lead to that character's death. This eventually causes a traumatic night for the cast as the character who dies turns into a "Windigo", a devilish creature, and tries to hunt down everyone, who are stuck on a snowy mountain. The whole game is about what choices you make and they all have a huge impact on what happens in the story.
This kind of system is actually referenced in the game as the Butterfly Effect. And the idea that the player's choices affect events is shown throughout. Such as in the first part of the game, where one of the characters called Chris sees a squirrel while he's holding a gun. You get the choice to shoot it or spear it. If you spear it, then nature remains in balance and later on in the game were another character called Sam is running from someone trying to capture her, she gets a chance to hide as long as the player plays it well. However, if Chris shoots the squirrel, nature attacks back with the crow scratching Sam. So later in the game with the same chance scene, Sam's wound from the crow opens causing her to leave a trail of blood, revealing her location and thus preventing the player's ability to make her hide.
The messages of this game are that karma comes to bite us all. Our actions no matter how small they are can drastically change the events of your life. That we all sometimes have to answer back to what we have done. Very similar to Infamous
And moments like the different events that can happen at various story points with Sam, dependent on what Chris does teaches the lesson that our actions can have great effects on other people. That even if we aren't directly harming another, we can still indirectly cause them pain.
Auteur 1: Auteurs convey their messages in different ways, some being more personal to the director themselves, such as Lorne Lanning; a director who makes games that are allegories of the issues with the world. Not only does this help covey their point more with focusing on a particular theme through different games, but also screams out to players of whose work it is. Like as if it's a metaphorical "mark" that people can see and recognise who was responsible for it.
I consider him an auteur as most of the games he's worked on are a part of the Oddworld series, featuring some of the same characters and all exploring the same theme in different ways. All explore the theme of how corrupt industry can be and that regardless of if they are just doing a job and providing for people, they can still be doing morally incorrect things. As in each game, the main character Abe has to work to save many living beings from being enslaved or becoming food. These games also follow the theme of karma just like Infamous and Until Dawn, however, in this case, they focus more on the concept that if you abandon or go against your comrades, it can come back to bite you. As in all games its possible to get a bad ending due to the player not saving the various characters they can optionally save. Leaving them to see the people he was supposed to save abandon or go against him to leading him to die in horrific ways. All these are present in all games, showing that Lorne Lanning is really trying to hone in on these themes and that's the mentality of an auteur.
Auteur 2: Another auteur is Marc Guggenheim, who was the writer of the X-Man Origins: Wolverine game that was an adaption of the movie.
I consider him an auteur as the game is drastically different from the movie. From the setting, being grimier, the graphic imagery with there being a lot more gore and horror but also the story itself. In the beginning, the main protagonist Wolverine has to escape a facility that has trapped in. In the movie, he got out without much issue, but in the game it gets Wolverine to fight an army of enemies and have many different interactions before managing to get up, upstaging the action. Another part wherein the movie, Wolverine has a short interaction with a character called Gambit. The game made it an entire chance sequence. Scenes are different, a lot more additions are in the game and it has a lot more emphasis on the violence. What makes this a work of an auteur, is that he took something made by something else, and drastically changed it that makes Marc's work on the game a lot more unique to himself and makes it easier to credit him separately for it regardless of the original director. These changes can also help spread the message of the story better, that the world Wolverine lives isn't a pleasant one and how he's not a typical hero based on his methods on how he deals with his enemies. That's why I believe Marc Guggenheim is an auteur.
Overall Point: I believe games are very effective at conveying messages at a large sufficiency. Gaming is a large medium that message can spread through billions As previously mentioned, games have a factor that no other median has, interactivity. Because the person has to play through the game, the events that happen in it can be a lot more personal, especially with games where you have to make choices as it can make the player feel whatever happens is their fault.
However, I do believe games can do more to make these messages much more impactful. Games should try to their messages within the physical gameplay more. Using the previously mentioned games as examples, Tomb Raider's messages is within the story, mostly only being sufficient enough to be something enjoyable to watch. And people who aren't interested in the stories of the game wouldn't be effective at all. However, games like Infamous has most of their messages in the gameplay itself. Making it more of an experience rather than a story that you see. It also forces the player to know and understand what the game is trying to say as you cant escapes experiencing how the game is designed. This, in my opinion, will really help boost the effectiveness on how videogames can convey their messages.
Conclusion: This topic is very intriguing to me and has gotten me to really think about how I should make my games in the future. Not only for this course but as my career in general. I'm aware that for my final project, I will have to choose my own theme and make a game based upon that. Having to do a lot of research and development. Now I know how much more effectual my project can be if I take deep thought with what my message will be. And now that I have gotten a better analysis of how a game can effectively convey a message, I have a better idea of how I will go about it. When I'm planing what kind of game my project will be, I will take deep though on how to implant it into the gameplay. Thus not only helping me break down to what my game will be for planning but also boosting the whole theme of it also. And finally, I am thinking of how I can become an Auteur myself. If I can create my own theme or style that can remain consistent through all my future projects. Allowing my messages to be more recognisable and thus more potent.
Tuesday 5th October 2019
Unity Session 2
Pusher Man

First, we create a Terrain object on the Hierarchy. The terrain object is a flat sure that represents the surface that the character would be walking on.
Clicking the dropdown menu under the Terrain tool pannel, while having the paint tool selected, gives you different options. With Raise or Lower Terrain selected, you are given a brush which can drag parts of the surface up. This is very useful if you are creating things like mountains or any kind of object that is connected with the earth. Holding Left click while dragging up on the same area allows the section the brush is on to extrude upwards. Left-Clicking while dragging the brush allows a more subtle extrusion over the surface it paints over. This can be useful for making rough and rocky surfaces.


Next, selecting Paint Texture in the dropdown menu will allow you to add colour and texture to the Terrain. Clicking Edit Terrain Texture and then Create New Layer will bring up a panel where you can select ant image in your project file. Whatever image you select will be spread throughout the surface of the Terrain. Doing this again but selecting another image will add that image to the Inspector panel along with the previous. Now by clicking either image, you can paint over the Terrain with that image. This can be useful when you're designed the surface of the ground such as making it look like grass


After that, you can add Trees. To do this, you have to add tree files on the project file and then click on the Paint Tree tab on the toolbar. Then press Edit Tree. This will allow you to select one of the trees in the project file. After that, similar to the Paint Texture, you can paint trees on the Terrain. Simply clicking allows you to paste whatever trees you added. You can change the number of trees you paste using the brush size, the size using the tree hight and are various other things you can alter about them.


Next, you set up the physical objects which are the ball, cube and mase. You create a sphere, give it a material, then add the Rijed Body component to it which will allow the player to push it. Create a cube and also give it a material, then make one more cube but scale it to be as thin as a wall. Then make different copies of it and place them to form a mase.
Then you make the buttons and triggers that Eathen will use for the game. There is supposed to be two types. One that's supposed to be a hazard and another that will spawn the ball from the box. To make the former, I created 2 cylinders and scaled them to be flat as a circle and then added a material. Named it Danger as that's what the code will be looking for. Then I added a Plain which is mostly just a square, and give it the Rigidbody and Box Collider component with the trigger option ticked. This allows it to respond to Ethan. Then I added the script that I was given called Touch that was the code for whats supposed to happen when Ethan pushes the box on the plain. Lastly, I made another plain that will represent the goal where the player will push the ball to.


With all of that done, all that it is left is setting up the HUD. Just like last time, I just created a Canvus and added 2 texts with one being Wintext and the other Losetext. Then I added the coin/ skull images that represent the score the player has. To add them on you have to change their texture type to 2D and UI. Then I added the HUD script to the canvas and dragged all the assets that are needed for it.


Once that was done, the game was complete. Now Ethan can now push the box on the plain to turn it into a ball and push that ball to the goal to gain coins.
Reflection
What I would like to improve on this is learning how to make my own assets like buildings and characters and be able to place them in Unity which will help me start with the capability to creating my own levels.
Today, we had a live debate about The Impact Of Video Games In Society. There were two teams like the last time with one believing they have a positive impact and the other arguing the opposite. I was on the positive team. My statement was that video games can be socially, mentally and healthily beneficial and that when people correlate violence and health with games they don't always look at all the factors which make the games take more blame.
Research Notes
Debate
Reflection
Personally, I believe I did much better in this debate than in the first one by far. At first, I was quite nervous and anxious as I didn't write as many notes due to the fact that I had a lot of other work to do so I didn't get to do much research and writing as I wanted. However, once I stood up to talk my fears suddenly withed away and I managed to use what I had to make a clear, connected and compelling argument. I strutted less here and portrayed myself more confidently. This has really shown me that the tension from before you present can give you a false negative view on how it may go and that just being yourself can really help when you are presenting.
Another thing that helped was that I was confident with my arguments as they were points I had in other similar debates I've had with people, which has shown me that when making notes for live debates, it's best to make lines that come naturally and not get too hung in constructing everything word for word as if it doesn't sound as promising on stage, your confidence can spoil it in a second.

First, I went on my Blender file and selected all bones and frames of the animation and then clicked Bake Action. This makes all frames of the animation Keyframes, making it easier for Unity to play it.

Then I dragged the Blender file to the project folder to which it automatically converted it to a file. Then I saw my first issue. When I looked at my module, instead of it being in its initial position, it looked like it was on the first frame of the walking animation. My theory was that whenever a Blender object is put on Unity that has an animation(s) then it will stay on the first frame of the first animation it has.


However the player wasn't moving, nor was any animations triggering. So I decided to come back to this later.
Another thing that helped was that I was confident with my arguments as they were points I had in other similar debates I've had with people, which has shown me that when making notes for live debates, it's best to make lines that come naturally and not get too hung in constructing everything word for word as if it doesn't sound as promising on stage, your confidence can spoil it in a second.
Thursday 14th November 2019
Unity Session 3
Now that we know how to create our own environments in Unity,
we are now beginning to learn how to put our own characters in as I've already
made a walking animation on a human model in Blender.

First, I went on my Blender file and selected all bones and frames of the animation and then clicked Bake Action. This makes all frames of the animation Keyframes, making it easier for Unity to play it.

Then I dragged the Blender file to the project folder to which it automatically converted it to a file. Then I saw my first issue. When I looked at my module, instead of it being in its initial position, it looked like it was on the first frame of the walking animation. My theory was that whenever a Blender object is put on Unity that has an animation(s) then it will stay on the first frame of the first animation it has.
So I tried to go to the beginning of the walking animation
in Blender and reset the modules position and add it to
the keyframes. This was so that the standing position was
before the walking and should make the initial state like that in Unity,
however, this didn't work.
Then when I clicked on the ... file, I saw on the Inspector panel
that you can set Clips in the animation. It appeared
that these clips allowed you to make different animations by you choosing what
part of the animation you want to play by decided the frame start and finish
time. So I thought I would go back to the frames in the animation and have the
standing position fill out 2 frames at the end. As I believed that I could set
a clip to play frames 25-26 which would have the
standing.


The preview of the Idle clip on the
bottom right showed that it's managed to get the standing position. However,
when I selected the Idle animation that was a part of the FBX pack,
it still showed it is on the first frame of the walking
so that didn't work either.


So then I decided to watch a video of someone importing
their character in Unity. Then I saw them on Blender being
able to set up multiple animations for a Blender object
which will have their own keyframes. So I made on for the
Idle and have the keyframes for the model standing. And now when I looked back
at it in Unity, It finally was in an Idle position.

However, Unity crashed before I got
to save it and the FBX file wasn't appearing properly
so I had to do it all again. I did everything I remembered doing, however, the
model still was on the walking frame. So I moved on from
that and opened the Animator screen. The Animator screen
is where you can control the animations of objects. The Orange box is the
Default Animation which I set to Idle. This didn't change how it looked on
the Scene view but when I booted game mode,
it did the start off with the Idle. I'm very confused to why it appears as the
first form of the walking animation but when I see others they appear as their
regular stance but as long as it starts off with the idle in
the game its not much of a problem.


Tuesday 19th November 2019
Unity Session 4

First I designed the area of the game but this time instead of using Terrain, I use a plain for simplicity sake and then added textures.
I moved on the next Unity project I was given. This time was beginning building a first-person shooter game. But because its a very complicated project, we started off with just learning how to animate the enemy.
Enemy Animation

First I designed the area of the game but this time instead of using Terrain, I use a plain for simplicity sake and then added textures.

Also for simplicity sake, I made the enemy a Capasal object.

I organised the animations I was going to set on the Animator panel. Then I learnt something I didn't realise before. I appeared that by default, the Animation Parameters are set to cloud and when creating a new one, you can set it as an int. When its an int, the equals option is available in the Inspector. Meaning that was one of the issues with the previous project, so I set that discovery aside.
Next, I had to open the Animation screen. The Animation screen is very similar to the Dope Sheet in Blender. Where the frames of the animations are shown and can be edited there. You can also use it to create animations. How it works is that when you select an object, there will be an option to create an animation. When you press it, it will allow you to chose where to save it (somewhere in the project file) and then you will be presented with the timeline. Then clicking Add properties will bring a dropdown that will ask what kinds of edits you want to do to the object. In this case, I used Transform which allows me to either alter the scale, position and/or the rotation of the object in the frames.
Using this, I managed to make an Idle, Moving and Attacking animation for the enemy.


Now that the animations were compleated, I started creating new parameters each for the different animations. Using them, I went to each animation transition and made Conditions for when they should trigger.

Then I had to define how much the enemy can move around in by opening the Navigation panel. The Navigation panel. The Navigation panel appears to be where you can control how an object can move around an area. Using this, I made the walkable area go throughout the whole ground.

Lastly, I added the Enemy AI script. which is the code to make the enemy follow the player, and toggled the chase radius which is how close the player can get to it before it starts to chase.
I finished the animation and chase for the enemy at this point which is very good, as this means in the future I can swap the capsule shape with anything else I want.

Using this, I managed to make an Idle, Moving and Attacking animation for the enemy.


Now that the animations were compleated, I started creating new parameters each for the different animations. Using them, I went to each animation transition and made Conditions for when they should trigger.

Then I had to define how much the enemy can move around in by opening the Navigation panel. The Navigation panel. The Navigation panel appears to be where you can control how an object can move around an area. Using this, I made the walkable area go throughout the whole ground.

Lastly, I added the Enemy AI script. which is the code to make the enemy follow the player, and toggled the chase radius which is how close the player can get to it before it starts to chase.
I finished the animation and chase for the enemy at this point which is very good, as this means in the future I can swap the capsule shape with anything else I want.

Thursday 21th November 2019
Unity Session 5

When I walked the up-to-the house with my character, not only could the interior not be visible through the front but also there were no collisions. I tried giving it the Regidbody component that I used on the ball for the pusher man. But this didn't work. So I decided to skip working on the environment and just continue with the build of the game.

I got to work on the assets for the guns shooting. First, I added the target icon to the HUD in the centre

Then I made the blasting of the bullets by creating a particle system object on the Hierarchy and giving it the appropriate settings calling it MuzzleFlash along with another one that I had to call HitFX. When I added the Weapon script with the gun, the code spawns these particles whenever the screen is clicked, representing the impact of the bullets of the gun.

Then I finished off the HUD by making buttons for if the player fails and then added all the remaining scripts to where they should be such as the enemy health.

Lastly, I changed the HUE of the Skybox. This is done by creating material and changing the shader to SkyBox/Procedural and dragging it on the Skybox. This will allow you a lot of control over how it looks, such as its colour and its sun.
Now I have compleated the task, managing to have an enemy that chases the player and the player being able to shoot and kill it.

Monday 25th November 2019
Unity Session 5
I continued working on the first-person shooter. With the animation and movement of the enemy completed, I decided to start making the environment. Such as making buildings. I was going to use the objects available in Unity but I found it a bit restrictive so I decided to use Blender as it allows a lot more features to edit and create objects.
I managed to create a basic house with a door, by scaling a cube to make the base and using angled cuboids to make the roof. Then I just cut a rectangle in the middle of it to make the door. When fiddling about with what materiel to give it, I saw that the Emission one gave it a glowing effect within it. So I thought I'd make it a house filled with Gamma Radiation and thus I made a sign for it on Photoshop and added it as an image texture.
The only part I struggled with was adding the image texture, as to do so you have to mark the seams to expose the net of the object. But I find it difficult to correctly mark them on objects so this is something I need more practice and research on. But overall, it took me no more than 30min to make the house, not including adding the materials. Meaning that my modelling skills and proficiency with Blender are improving as I was able to make it without aid or reference in little time.


The only part I struggled with was adding the image texture, as to do so you have to mark the seams to expose the net of the object. But I find it difficult to correctly mark them on objects so this is something I need more practice and research on. But overall, it took me no more than 30min to make the house, not including adding the materials. Meaning that my modelling skills and proficiency with Blender are improving as I was able to make it without aid or reference in little time.


I added it into Unity, along with a gun model that I found online, and managed to pass on the image texture but the emission material didn't remain. I wasn't sure why but still wanted to continue so that was something else I had to take a look at later.

When I walked the up-to-the house with my character, not only could the interior not be visible through the front but also there were no collisions. I tried giving it the Regidbody component that I used on the ball for the pusher man. But this didn't work. So I decided to skip working on the environment and just continue with the build of the game.

I got to work on the assets for the guns shooting. First, I added the target icon to the HUD in the centre

Then I made the blasting of the bullets by creating a particle system object on the Hierarchy and giving it the appropriate settings calling it MuzzleFlash along with another one that I had to call HitFX. When I added the Weapon script with the gun, the code spawns these particles whenever the screen is clicked, representing the impact of the bullets of the gun.

Then I finished off the HUD by making buttons for if the player fails and then added all the remaining scripts to where they should be such as the enemy health.

Lastly, I changed the HUE of the Skybox. This is done by creating material and changing the shader to SkyBox/Procedural and dragging it on the Skybox. This will allow you a lot of control over how it looks, such as its colour and its sun.
Now I have compleated the task, managing to have an enemy that chases the player and the player being able to shoot and kill it.

Reflection
Although I didn't manage to complete every single asset of the project, I was still able to complete the task sheet given and have a working enemy and shooting mechanic. I've learned quite a lot from this task, mainly more on how animations work in Unity and the basics of making a first-person game. Now that the basics are done, I'll definitely come back to this project and add in things to try to understand things I had to skip, such as having collisions for objects imported from Blender and making the interior of bildings visible and eventually I'll make it all my own creative thing.
Monday 25th November 2019
Today, I conducted a presentation on the topic of controversies within the gaming industry which is an extension of all the theory work we have done so far.
Reflection
I really enjoyed making this presentation and I learned a lot more about PowerPoint itself such as how to make interactable buttons.
Script
PowerPoint
Video
Script
PowerPoint
Video
With how I presented, I was a lot more prepared for this one which allowed me to speak more clearly and a lot fewer nerves than I had in previous presentations. However, I still find that sometimes I stumble on my words, mainly when I would lose where I was on my script and had to improvise a bit. So I need to work on building my ability to naturally present without a script. This would make my presentation stronger as I would look even more prepared and well-spoken.

At the beginning of the day, my teacher went through my project where I attempted to add me, 3D model, that didn't work. She told me there was something possibly corrupt with the project as the player script wouldn't attach. But when she opened a new project and imported all of the assets from mine it managed to work but due to the way it was coded, it could only walk in one direction.
This was clearly not going to be enough for me to know the full ins and outs in generating a basic 3rd person character with its limited movement and the fact I don't know how it didn't work in the first place. So I decided that my first smart target of independent research would be on this same topic but possibly using a different method to see if it's more effective. This is because I believe it's important to know to create a basic character from all different persons (e.g 3rd,1st) as this will be one of the building blocks to building any type of 3D game. And also because we may decide to have our class project to be either 3rd or 1st person so know how to do both will prepare me for whatever happens.
Upon looking at many videos for people showing how to make a 3rd person control, the majority just used templates and pre-made standard assets. They are quite simple methods, however, I don't believe they get me to fully understand how it all works nor do I believe it would be attractive to future collaborators/partners if most of what I can do come from others work. So eventually I came across another one of Sebastian Lague's videos, who I found really helpful when learning about blender and who makes detailed and effective series. Conveniently, has multiple series of videos about Unity, one of which is about character creation in the context of a 3rd person control.
What's different about his video, is that he builds it all from the ground up and explains every step of the way. So I decided to use this video for that reason, also because I'm now very familiar with him.
But before I started with it, I decided to go back to my human rigged model with the walking animation and give it a running and idle animation so that I can use them for this project.

So using another one of Sebastian Lague's videos, I created the run animation. It was quite easy as I already made a walk animation so I was already familiar with the method.

I made my Idle very simple, just having the model clamp its hands and have its chest go up and down to emulate breathing.
Then I got started with importing it into Unity juxtaposed with the video.
Straight off the bat, I learned something that I didn't know from the last time. After changing the rig type to Humanoid, telling blender that my model is a human-like a body, I had to configure the right which put it on a T-pose than detected all the bones. Apparently, if the whole human image is green then all bones were correctly made and the character having this T-Pode is important as when I reset it to the default pose I had it was stating that there's no T-Pose. So next time I model a character I will make sure I make it with a T-Pose as I'm starting to be more and more how important the T-Pise is.


At this point in the video, Sebastian explained a movement principal called Root Motion. Root Motion is where the movement of an object is done within the animation and the movement is then looped to simulate a consistent movement. The advantage of this is that the movement may feel more natural as you would literally be deciding and controlling how it would move, but it, however, can also make the controls feel less responsive as the movement would be separate from the code that makes it move.
Code-based movement is where the movement of the object is done only through code. This can cause it to look less realistic and have Foot Sliding, where the steps don't juxtapose well with the forward movement. However, it can me better responsive as its controls are all controlled by the script.
Tuesday 3rd November 2019
From compleating all projects given to me, I have now learned most of the basics of Unity's user-interface and still very proficient with Blender. Soon we will take part in a group project where we all will have our roles that will contribute to it. So from this point, I will be doing independent research on different skills and abilities I wish to have or develop in both Unity and Blender, preparing myself for the project and for future use.

At the beginning of the day, my teacher went through my project where I attempted to add me, 3D model, that didn't work. She told me there was something possibly corrupt with the project as the player script wouldn't attach. But when she opened a new project and imported all of the assets from mine it managed to work but due to the way it was coded, it could only walk in one direction.
This was clearly not going to be enough for me to know the full ins and outs in generating a basic 3rd person character with its limited movement and the fact I don't know how it didn't work in the first place. So I decided that my first smart target of independent research would be on this same topic but possibly using a different method to see if it's more effective. This is because I believe it's important to know to create a basic character from all different persons (e.g 3rd,1st) as this will be one of the building blocks to building any type of 3D game. And also because we may decide to have our class project to be either 3rd or 1st person so know how to do both will prepare me for whatever happens.
Upon looking at many videos for people showing how to make a 3rd person control, the majority just used templates and pre-made standard assets. They are quite simple methods, however, I don't believe they get me to fully understand how it all works nor do I believe it would be attractive to future collaborators/partners if most of what I can do come from others work. So eventually I came across another one of Sebastian Lague's videos, who I found really helpful when learning about blender and who makes detailed and effective series. Conveniently, has multiple series of videos about Unity, one of which is about character creation in the context of a 3rd person control.
What's different about his video, is that he builds it all from the ground up and explains every step of the way. So I decided to use this video for that reason, also because I'm now very familiar with him.
But before I started with it, I decided to go back to my human rigged model with the walking animation and give it a running and idle animation so that I can use them for this project.

So using another one of Sebastian Lague's videos, I created the run animation. It was quite easy as I already made a walk animation so I was already familiar with the method.

I made my Idle very simple, just having the model clamp its hands and have its chest go up and down to emulate breathing.
Then I got started with importing it into Unity juxtaposed with the video.
Straight off the bat, I learned something that I didn't know from the last time. After changing the rig type to Humanoid, telling blender that my model is a human-like a body, I had to configure the right which put it on a T-pose than detected all the bones. Apparently, if the whole human image is green then all bones were correctly made and the character having this T-Pode is important as when I reset it to the default pose I had it was stating that there's no T-Pose. So next time I model a character I will make sure I make it with a T-Pose as I'm starting to be more and more how important the T-Pise is.


At this point in the video, Sebastian explained a movement principal called Root Motion. Root Motion is where the movement of an object is done within the animation and the movement is then looped to simulate a consistent movement. The advantage of this is that the movement may feel more natural as you would literally be deciding and controlling how it would move, but it, however, can also make the controls feel less responsive as the movement would be separate from the code that makes it move.
Code-based movement is where the movement of the object is done only through code. This can cause it to look less realistic and have Foot Sliding, where the steps don't juxtapose well with the forward movement. However, it can me better responsive as its controls are all controlled by the script.


No comments:
Post a Comment